Integrating JavaFX into NetBeans on Slackware
After making sure that the samples are working great on our system based on my previous post, we can continue by integrating JavaFX into NetBeans, a nice and cool IDE suitable to work with many programming languages, mainly Java.
The latest version of NetBeans currently is 7.1.1 as this post is composed. You can download it directly from their download page and you can choose which version of NetBeans that you want to pick. I usually pick the complete version. Although it's quite big in terms of size (210 MB), it's really a good IDE and it's really worthed.
If you haven't got Java Development Kit and NetBeans, i would suggest you to download the bundled package available at Oracle's website directly. That saves your time. This article is assuming that you have NetBeans installed and you wanted to start developing JavaFX applications. Remember that JavaFX requires Java JDK 1.6.0 update 26 or later, or Java 7. I used Java 7 Update 3 (1.7.0_03) in my system.
First, fired up NetBeans and click on the "Try a Sample Project" on the first dialog screen. Pick Samples > JavaFX and pick any random samples (i used FXML-LoginDemo). You will notice that NetBeans complained that there's no JavaFX support

We actually have JavaFX installed correctly, but NetBeans didn't notice changes that we have made previously. So the solution is by creating a new "profile" that has JavaFX installed on our system.
First, open up a new terminal and move the JavaFX directory (javafx-sdk2.1.0-beta) to a directory /usr/local/netbeans-7.1/javafx/ (Change this path according to the path you have chosen to install NetBeans), so that it's now located under /usr/local/netbeans-7.1/javafx/javafx-sdk2.1.0-beta/ on my system.
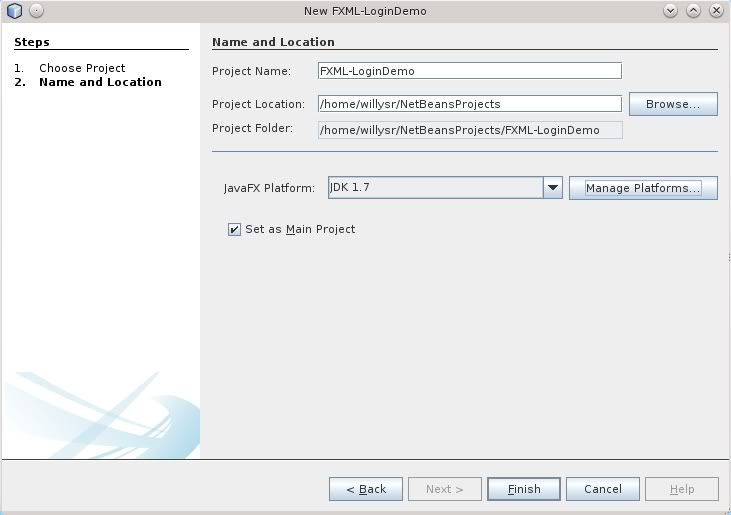
Next, we go back to the sample dialog and click on Manage Platform. Add a new platform and locate where you installed your JDK (in my system, i placed it under /usr/java/jdk1.7.0_03). You will see a new platform called JDK 1.7 installed on top of the default platform and it has 4 tabs instead of 3 as in the default and the new tab is of course, JavaFX.
Click on JavaFX tab and tick to enable JavaFX. Next, browse to the place where you placed the JavaFX directory above so it looks like this

Once it's done, you can go back to the initial dialog and you will notice that the warning is now gone
 You can click on the Finish button to complete the setup and enjoy the JavaFX sample. You can logged in using "demo" as both the username and password.
 Basically this tells us that NetBeans is now ready to be used to produce JavaFX-based applications. It's now your turn to produce those amazing products.
The latest version of NetBeans currently is 7.1.1 as this post is composed. You can download it directly from their download page and you can choose which version of NetBeans that you want to pick. I usually pick the complete version. Although it's quite big in terms of size (210 MB), it's really a good IDE and it's really worthed.
If you haven't got Java Development Kit and NetBeans, i would suggest you to download the bundled package available at Oracle's website directly. That saves your time. This article is assuming that you have NetBeans installed and you wanted to start developing JavaFX applications. Remember that JavaFX requires Java JDK 1.6.0 update 26 or later, or Java 7. I used Java 7 Update 3 (1.7.0_03) in my system.
First, fired up NetBeans and click on the "Try a Sample Project" on the first dialog screen. Pick Samples > JavaFX and pick any random samples (i used FXML-LoginDemo). You will notice that NetBeans complained that there's no JavaFX support
We actually have JavaFX installed correctly, but NetBeans didn't notice changes that we have made previously. So the solution is by creating a new "profile" that has JavaFX installed on our system.
First, open up a new terminal and move the JavaFX directory (javafx-sdk2.1.0-beta) to a directory /usr/local/netbeans-7.1/javafx/ (Change this path according to the path you have chosen to install NetBeans), so that it's now located under /usr/local/netbeans-7.1/javafx/javafx-sdk2.1.0-beta/ on my system.
Next, we go back to the sample dialog and click on Manage Platform. Add a new platform and locate where you installed your JDK (in my system, i placed it under /usr/java/jdk1.7.0_03). You will see a new platform called JDK 1.7 installed on top of the default platform and it has 4 tabs instead of 3 as in the default and the new tab is of course, JavaFX.
Click on JavaFX tab and tick to enable JavaFX. Next, browse to the place where you placed the JavaFX directory above so it looks like this

Once it's done, you can go back to the initial dialog and you will notice that the warning is now gone