How to install and configure Squid Proxy server in Linux CentOS/RHEL 6
What is Squid Server ?
Squid proxy server is also know as gateway server and catching server . It provide internet access to the multiple client at same time.The main purpose of using proxy server is to maintain the web catche directory in server and provide the faster way to access internet website.
Features of Squid server
- Maintain Web cache
- Website Restriction and can define internet access policy per user
- Easy to maintain Using CLI and Graphically
- Bandwidth control
Operating System: CentOS- 6.3
Server Name: server.example.com
Server IP Address: 192.168.0.65
LAN Network: 192.168.0.0/24
Config File: /etc/squid/squid.conf
Log file : /var/log/access.log
Cache dir : /var/spool/squid
Default Port: 3128
service: squid
Selinux: disabled
Install Squid package
# yum install squid -y
Check Squid installed package
#rpm -qa squid
Start Squid Service
# service squid start
On service permanently
# chkconfig squid on
Check Service Status
# service squid status
squid (pid 2799) is running...
2017/02/05 00:09:29| WARNING: Could not determine this machines public hostname. Please configure one or set 'visible_hostname'.
2017/02/05 00:09:30| WARNING: Could not determine this machines public hostname. Please configure one or set 'visible_hostname'.
If you find above error, add "visible_hostname servername" in bottom of squid conf file
#vim /etc/squid/squid.conf
visible_hostname server.example.com
After change reload squid service
#service squid reload
Now configure squid.conf file to provide internet access to the Client
#vim /etc/squid/squid.conf
acl ourlan src 192.168.0.0/24
http_access allow ourlan
Snapshot of conf file
# Squid normally listens to port 3128
http_port 3128
##Enable cache directory
#service squid restart
Note: In squid create ACL rule first and implement that rule with http_access section.
# cd /var/spool/squid/
# ls
00 01 02 03 04 05 06 07 08 09 0A 0B 0C 0D 0E 0F swap.state
Note:- Here we have 16 cache directory and also each directory have 256 directory.
swap.state: Keeps information about indexing information.
10000 = Cache directory size, you can increase size as per your hardisk size.
10000 = Cache directory size, you can increase size as per your hardisk size.
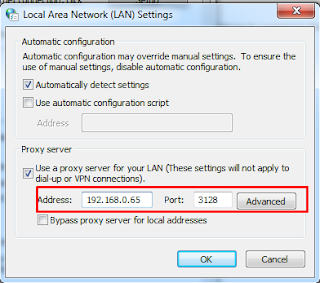
On Internet Explorer
IE-->Tools-->Internet Oprions-->Connections-->LAN Setting
or, shortcut
Go to, Run and type here: inetcpl.cpl
On Google Chrome
Set up or change network connections in Google Chrome
Click the Chrome menu on the browser toolbar (
Select Settings.
Click Show advanced settings.
In the "Network" section, click Change proxy settings .

On Firfox Mozilla
Tools --> Options --> Advanced -- > Network --> Settings
Check internet on Client machine by access google.com
Grep logs on server
#tail -f /var/log/squid/access.log
1486236119.219 115212 192.168.0.5 TCP_MISS/200 4614 CONNECT www.google.co.in:443 - DIRECT/216.58.196.35 -
1486236119.220 115251 192.168.0.5 TCP_MISS/200 4613 CONNECT www.google.co.in:443 - DIRECT/216.58.196.35 -
1486236119.220 115231 192.168.0.5 TCP_MISS/200 4614 CONNECT www.google.co.in:443 - DIRECT/216.58.196.35 -
1486236247.973 241283 192.168.0.5 TCP_MISS/200 5165 CONNECT www.google.com:443 - DIRECT/216.58.196.36 -
1486236275.500 240350 192.168.0.5 TCP_MISS/200 7017 CONNECT www.gstatic.com:443 - DIRECT/172.217.26.195 -
Installation and configuration part is completed, in next tutorial i will create restriction rule.


