Flashing Stock ROM on Samsung Galaxy S7 Edge Ft. Odin
Introduction :
In today's article, we are going to learn how to flash stock ROM on Samsung Galaxy S7 Edge using Odin. We can use this method to flash stock ROM on any Samsung device, with minor variations in files and by downloading stock ROM of that particular device.What is Stock ROM?
Stock ROM is the ROM i.e. in simple terms, the operating system or the variant of Android that is provided by the manufacturer by-default on the phone. So speaking of stock ROM, it can fix any firmware or software related issues present in the device.Why should I flash Stock ROM?
Flashing stock ROM can fix tons of issues, the application force close issues, issues related to rooting and even unbrick your device. Many-a-times, Stock ROM also speeds up the whole device.How to flash Stock ROM?
Flashing stock ROM is different for different devices, in some devices, like in Samsung devices, flashing is done using Odin whereas, in other devices, fast boot mode is used. In our case, we will be using the latest version of Odin to flash stock ROM.Downloading Stock ROM and ODIN
- Samsung Galaxy S7 Edge Stock ROM - https://goo.gl/RRZXM7
- Odin 3.12.3 - https://goo.gl/4U2CWj
Flashing Stock ROM on Samsung Galaxy S7 Edge using Odin:
Step 1:
Remove memory card and backup your device completely. Make sure your device is backed up because flashing Stock ROM can erase up the internal storage of the device.

Step 2: Downloading Required Stock ROM
You must download required stock ROM files from genuine websites like xda. sammobile provides genuine firmware for Samsung devices.

Step 3: Login to Download
Sammobile requires you to log into their website, in order to download the firmware.

Step 4: Downloading
Wait till firmware is completely downloaded. Also, download Odin, links are provided above.

Step 5: Download Mode
You must turn your device off. Make sure its 80% charged.

Step 6: Download Mode
Its time to press home button + volume down and power button altogether, to push the device into download mode.

Step 7: Continue
Press volume up button to continue into download mode.

Step 8: Getting Ready
Extract the firmware that we have downloaded.

Step 9: Preparing the device
It's time to extract Odin in the same folder and connect the device to the computer via USB.

Step 10: Flashing
Once the device is connected properly, a blue box will be shown in Odin. Just click on AP and select the AP file present in the firmware.
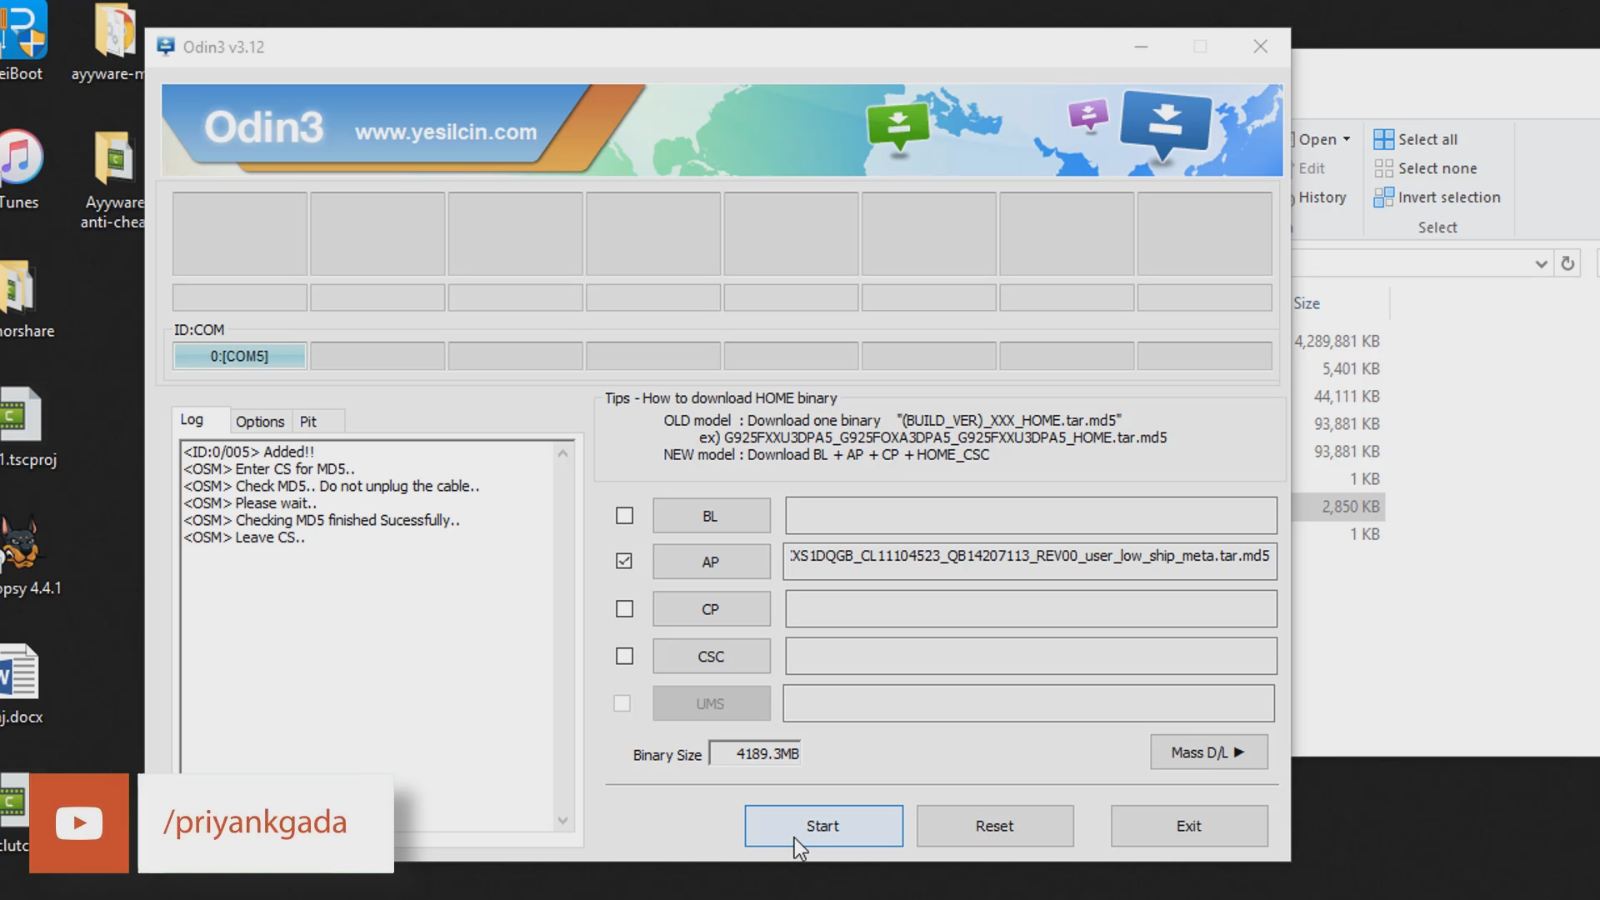
Step 11: Final Step
Click on start to start flashing and the device will automatically reboot.

Detailed Video
Here is a detailed video
