Turn your Raspberry Pi Device to an Ultimate Pentesting Machine | Lucideus Research
The project of Secure-PI was started to study the extent of Penetration Testing possible using small sized computers like Raspberry Pi. This project report articuates the type of hardware, software and the results obtained along with methodology adopted to carry out pentesting of targets. This project was successful in quantitative and qualitative measurements of the pentesting activities using a Raspberry Pi device and it' uses and limitations.
This report therefore specifies in detail the setup of the device and full process flow to exploit the targets. It also provides brief description of the tools used. This project highlights a very new emerging technique of Penetration testing possible using high quality tools and reliant hardware which can be easily camouflaged and used remotely to affect the target. This project report vividly documents some of the possibilities emerging from this new tool and hence can be used to generate awareness and safeguard measures to mitigate against such tools if used unethically.
This report documents the following in detail:
- Raspberry Pi and other hardware used
- Hardware Setup
- Operating System Used and Installation
- Tools used and Installation
- Procedure to perform exploits
- Final Summary and further possibilities of this project
Requirements
This section will list recommended requirements of hardware and software that are needed to perform the project.
Hardware:
- Raspberry Pi B+ Model ( Any Higher version is also suitable)
- LAN wire
- Micro USB 5V adapter
- 8GB CLASS10 SD Card
- HDMI cable
- USB Keyboard
- USB Mouse
- Display Screen
Software:
- Arch Linux ( Use the custom Raspberry Pi Image)
- Black Arch Repository
- NMAP
- Tcpdump
- Wireshark
- EtterCap
- OpenVAS
- Social Engineering Toolkit
- SSH Putty
- Any Reverse SSH Software
You might need a remote Control and Command Server to communicate with you device as in live scenarios direct interaction with the device can leave very easily traceable logs. The server can be hosted on any hosting provider network with atleast 20 GB storage for logs.Introduction:RASPBERRY PI
Introduction:
The Raspberry pi is a credit-card-sized computer. Originally designed for education creator Eben Upton’s goal was to create a low-cost device that would improve programming skills and hardware understanding at the pre-university level. It is a capable little computer which can be used in electronics projects, and for many of the things that a desktop pc does, like spreadsheets, word processing, browsing the internet, and playing games. It also plays high-definition video.
The raspberry pi is slower than a modern laptop or desktop but is still a complete Linux computer and can provide all the expected abilities that implies, at a low-power consumption level.
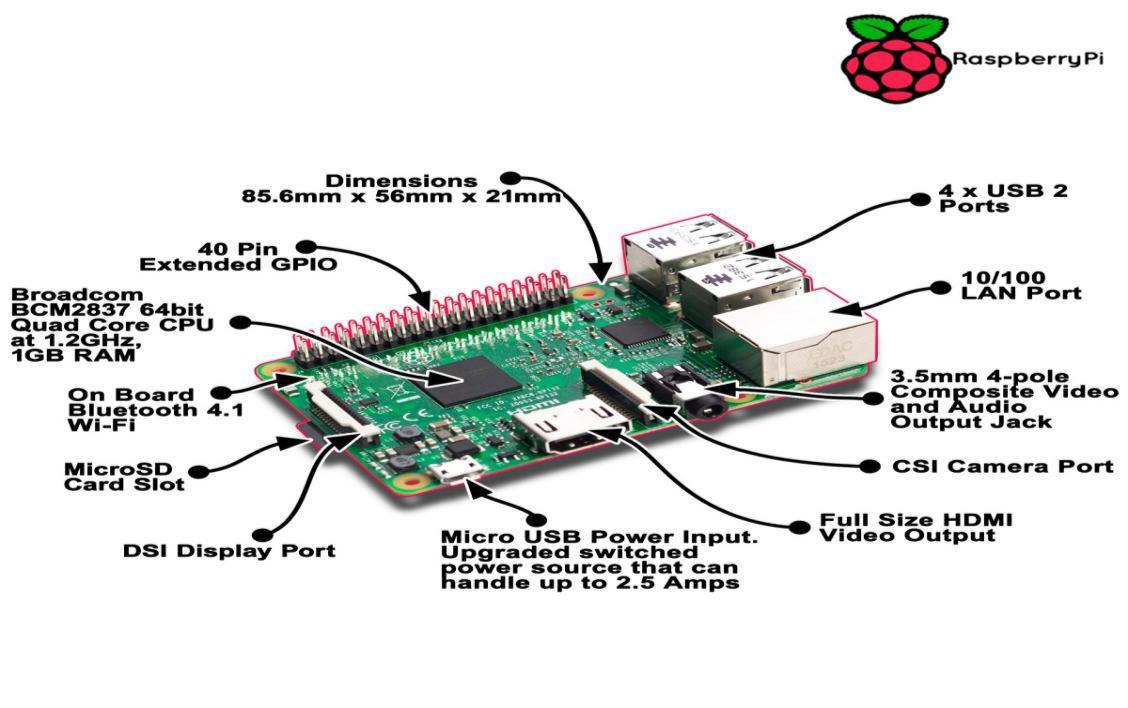
Schematics of a Raspberry Pi device
In this project we have used Raspberry Pi B+ model to function as a hacking tool. Following are the hardware specifications, advantages and disadvantages of the Raspberry pi used in the project, these should be properly analyzed before deciding to use any version of Raspberry pi model for penetsting.
Specifications:
- 512 MB RAM
- ARM1176JZF-S 700MHz processor
- Video core IV GPU
- HDMI video output and RCA video output
- Four USB ports
- MicroSD, MMC, SDIO flash memory card slot
- 40 pin 2.54mm header expansion slot
- Hobby & Hardware Hacking
- Imaging, Video & Vision
- Consumer Electronics
- Communications & Networking
- Integrated video core 4 GPU capable of playing full 1080p high definition Blu-Ray quality video
- 4-pole 3.5mm stereo audio jack with composite video output
- 5V micro USB power input jack
Advantages:
- Small size enables it to be camouflaged in target network easily
- Economic computer ( $35)
- Can be interfaced easily with analog and digital devices
- High throughput in comparision to its size
- Supports crossplatform tools and several operating systems
Disadvantages:
- Lack of power to run resource-intensive tasks
- Sometimes cannot support all the features of tool
- Sometimes time consuming due to limited computing power
Introduction:ARCH LINUX
Introduction:
Arch Linux is a Linux distribution for computers based on i686 and x86-64 architectures. It is composed predominantly of free and open-source software, and supports community involvement. Later on community support for ARM architecture also came into existence. The design approach of the development team follows the KISS principle ("keep it simple, stupid") as the general guideline, and focuses on elegance, code correctness, minimalism and simplicity, and expects the user to be willing to make some effort to understand the system's operation. A package manager written specifically for Arch Linux, pacman, is used to install, remove and update software packages.
Arch Linux uses a rolling release model, such that a regular system update is all that is needed to obtain the latest Arch software; the installation images released by the Arch team are simply up-to-date snapshots of the main system components.
Reasons for Choosing Arch Linux:
- Very Light weight OS
- Fully supported by Raspberry PI
- Fully Customizable
- Gives full control of the device to the Admin
- Secure
- Very good support community
- Supports several necessary tools for Pentesting
Setup of Arch Linux in Raspberry Pi:
- Download the Arch Linux ARM image from SourceForge.net using the following URL:
- Download SDFormatter tool and insert your SD Card in the PC using SD Card reader. Start SDFormatter, it will detect the presence if your SD Card. Select Format to format your SD Card fully. This will work in Windows. For OS X and Linux use dd command.
- After the formatting is complete we need to burn the downloaded image to the SD card for use. For this purpose download Win32 Disk Imager from Source Forge.
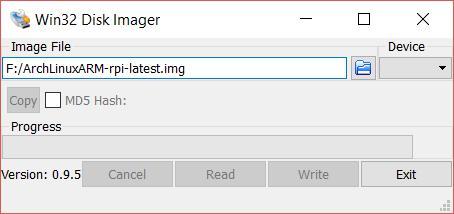
- Start the Win32 Disk Imager using administrator privilidges and select the image to be burned into the SD card.
- Now, after this insert the SD card in the slot of Raspberry Pi and Connect the Raspberry Pi to a monitor screen using HDMI cable and start the monitor and Raspberry pi.
- The screen will show the loading process of ARCH Linux and then when login prompt comes login using username: root password: root.
- Install a lightweight GUI (here we have used xfce4)
- The GUI can be started using “startxfce4” command.
- Also connect the external Keyboard and mouse to the device for input.
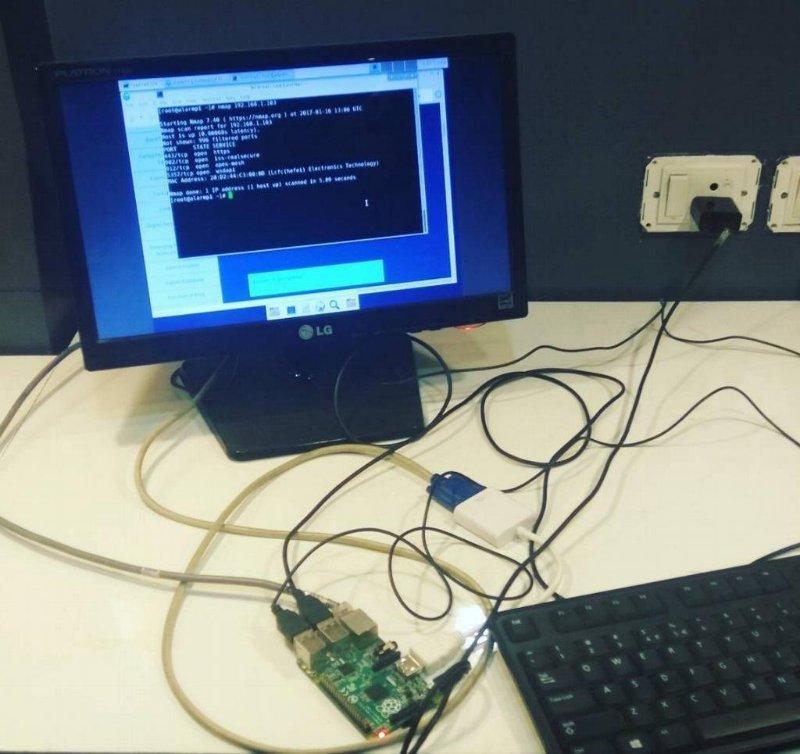
Fully functional Raspberry Pi connected to screen
This documentation completes the description of OS in the PI and articulates the full procedure to install it and make it functional.
Now we need to customize ARCH for our penetration testing and install required tools in it.Introduction:BLACKARCH LINUX
Introduction:
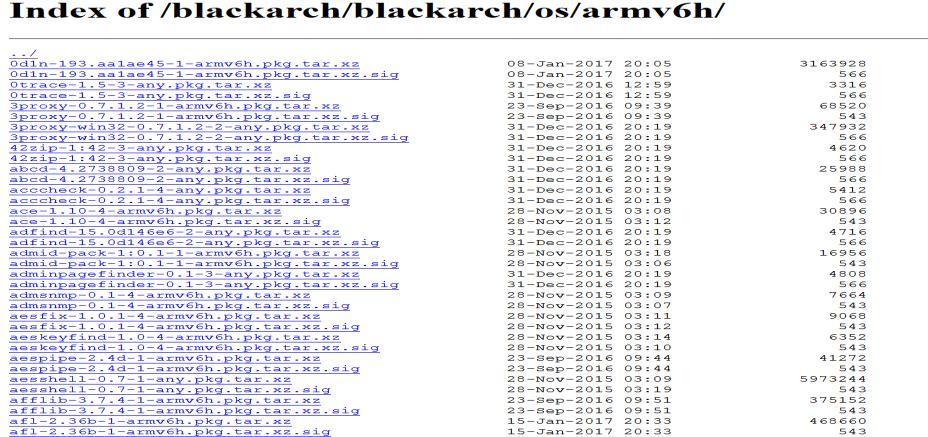
BlackArch is a complete Linux distribution for penetration testers and security researchers. It is derived from Arch Linux and users can install BlackArch components individually or in groups directly on top of it. The toolset is distributed as an Arch Linux unofficial user repository so you can install BlackArch on top of an existing Arch Linux installation. Packages may be installed individually or by category. The constantly expanding repository currently includes over 1600 tools. All tools are thoroughly tested before being added to the codebase to maintain the quality of the repository.
For our project we didn't install the full repository but instead only the required tools to ensure very light load on the device.
Tools which were downloaded are:
- Nmap
- Ettercap
- Wireshark
- Tcpdump
- OpenVAS
In the following sections we describe the cases in which we utilized these tools to carry out penetration testing.
Introduction: NMAP
Introduction:
Nmap (Network Mapper) is a security scanner originally written by Gordon Lyon, used to discover hosts and services on a computer network, thus creating a "map" of the network. Nmap is a free and open source (license) utility for network discovery and security auditing. Many systems and network administrators also find it useful for tasks such as network inventory, managing service upgrade schedules, and monitoring host or service uptime.
Nmap uses raw IP packets in novel ways to determine what hosts are available on the network, what services (application name and version) those hosts are offering, what operating systems (and OS versions) they are running, what type of packet filters/firewalls are in use, and dozens of other characteristics. Nmap is also capable of adapting to network conditions including latency and congestion during a scan. Nmap is under development and refinement by its user community.
Nmap was originally a Linux-only utility, but it was ported to Windows, Solaris, HP-UX, BSD variants (including OS X), AmigaOS, and IRIX. In addition to the classic command-line Nmap executable, the Nmap suite includes an advanced GUI and results viewer (Zenmap), a flexible data transfer, redirection, and debugging tool (Ncat), a utility for comparing scan results (Ndiff), and a packet generation and response analysis tool (Nping).It is also available in Kali Linux suite of softwares used for Information gathering. It can also be downloaded from GitHub or Official Kali repository.
Setup and Working of nmap:
Nmap can be downloaded as follows:
- “ sudo pacman -S nmap ” (For ArchLinux)
Nmap can be easily run from command line interface using nmap command with some options. Some of the most used options are:
-p : Enable port scan
-A : Enable OS detection, version detection, script scanning and traceroute
-Sv : Service port Scan
-6 : Use IPV6 scan
-f : Fragment packets to escape firewall
--help: Display help options.
Following are some command line results generated using NMAP for information gathering.
1. Direct IP Scan:
This is direct IP scan of target without any options.
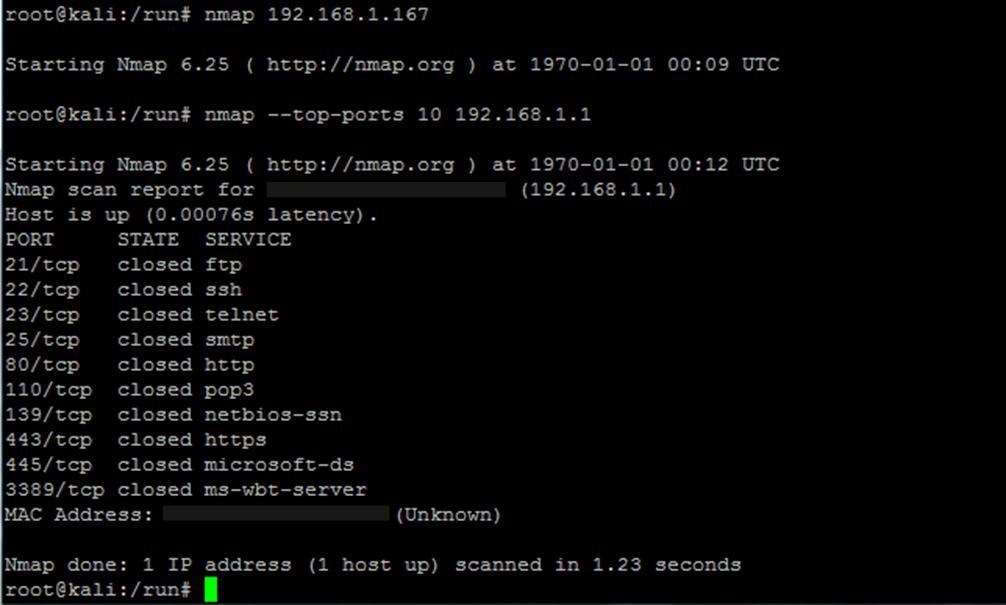
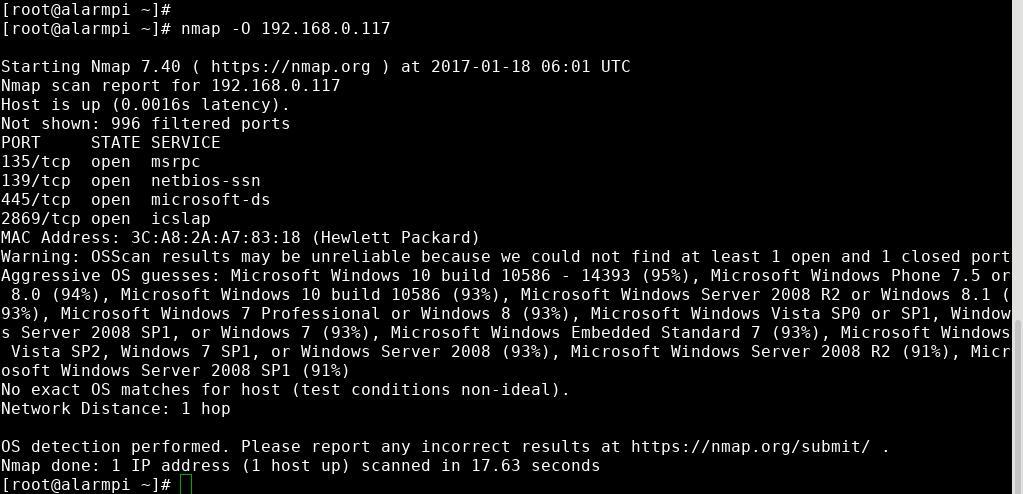
2. OS Detection:
This scans the IP address of the target with OS detection of the target.
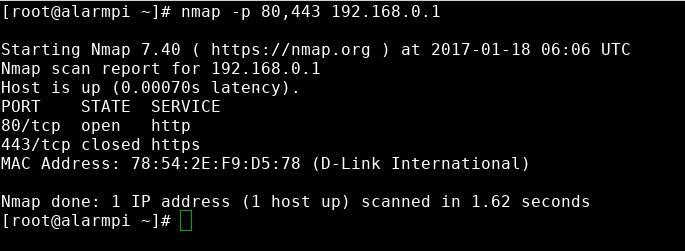
3. Port Scan:
This scans the IP address of the target with Port Scan of the target.
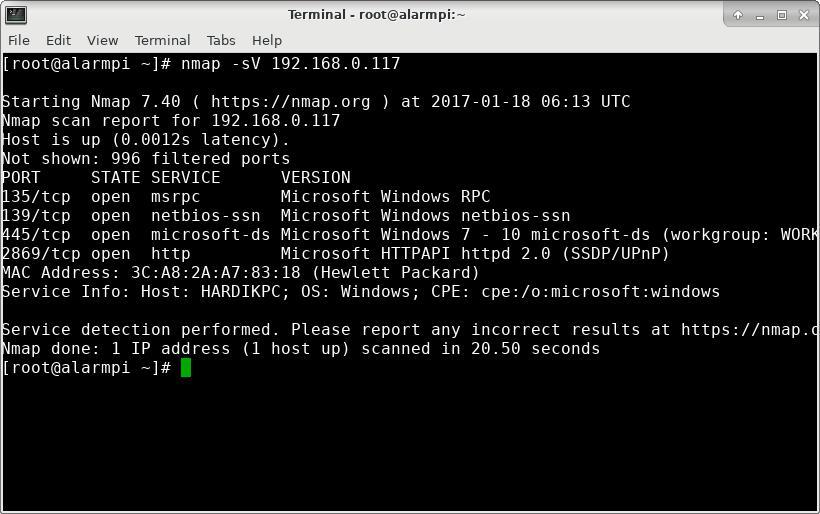
4. Service Scan:
This scans the IP address of the target with Port Scan and List of Services running on those ports of the target.
5. Decoy Scan:
Nmap has -D option. It is called decoy scan. With -D option it appear to the remote host that the host(s) you specify as decoys are scanning the target network too. Thus their IDS might report 5-10 port scans from unique IP addresses, but they won’t know which IP was scanning them and which were innocent decoys. While this can be defeated through router path tracing, response-dropping, and other active mechanisms, it is generally an effective technique for hiding your IP address.
Introduction:Ettercap
Introduction:
Ettercap is a free and open source network security tool for man-in-the-middle attacks on LAN. It can be used for computer network protocol analysis and security auditing. It runs on various Unix-like operating systems including Linux, Mac OS X, BSD and Solaris, and on Microsoft Windows. It is capable of intercepting traffic on a network segment, capturing passwords, and conducting active eavesdropping against a number of common protocols.
Setup and Working of Ettercap:
EtterCap can be installed using following command set:
- “ pacman -S ettercap ettercap-gtk ” (ArchLinux)
After installation is complete power up the GUI of Ettercap using the following Command
step1: ettercap –G
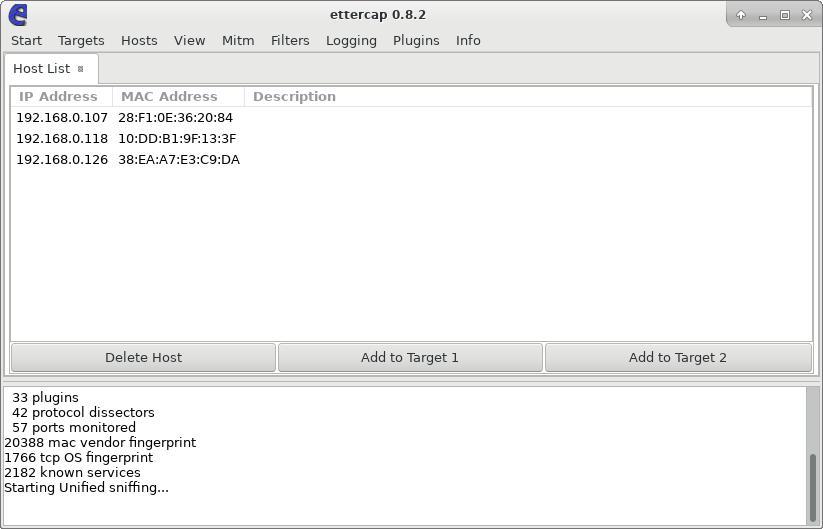
Step2: Select Sniff → Unified Sniffing → Network Interface: eth0
Step3: Select Hosts → Hosts List
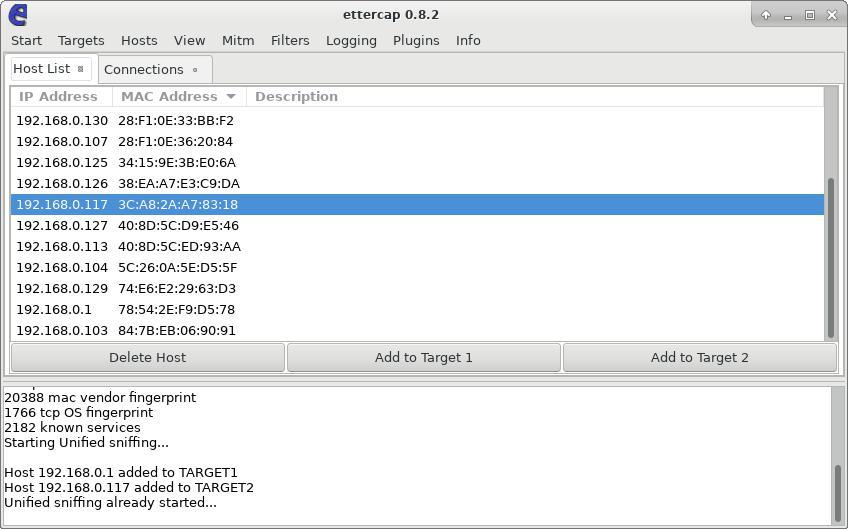
Step4: Select two targets between whom you want to conduct Man-In-The-Middle Attack and add them to Target1 and Target2
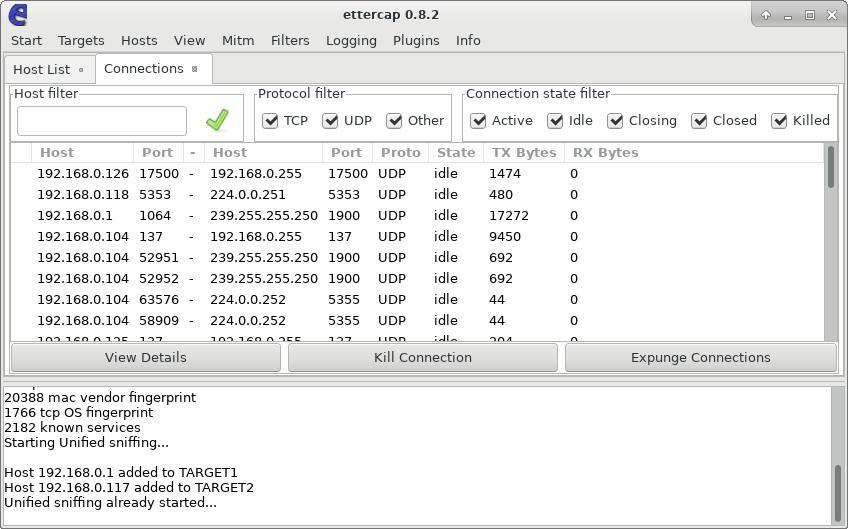
Step5: Select Start → Start Sniffing
Step6: After that goto Connections and eavesdrop the packets, Wire shark can also be utilized for this purpose.
Introduction: Wireshark
Introduction:
Wireshark is a free and open source Network packet analyzer. It is used for network troubleshooting, analysis, software and communications protocol development, and education. Originally named Ethereal, the project was renamed Wireshark in May 2006 due to trademark issues.
Wireshark is cross-platform, using the Qt widget toolkit in current releases to implement its user interface, and using pcap to capture packets; it runs on Linux, macOS, BSD, Solaris, some other Unix-like operating systems, and Microsoft Windows. There is also a terminal-based (non-GUI) version called TShark. Wireshark, and the other programs distributed with it such as TShark, are free software, released under the terms of the GNU General Public License.
Some intended purposes:
Here are some examples people uses Wireshark for:
- Network administrators use it to troubleshoot network problems
- Network security engineers use it to examine security problems
- Developers use it to debug protocol implementations
- People use it to learn network protocol internals
Setup and Working of Wireshark:
Step1: Wireshark can be downloaded using the command in Terminal
“ pacman –S wireshark-gtk ”
Step2: Launch the wireshark tool by typing the command in interminal
“ wireshark-gtk ”
Step3: Select the interfaces to sniff upon. Here we choose the “ eth0 ” interface
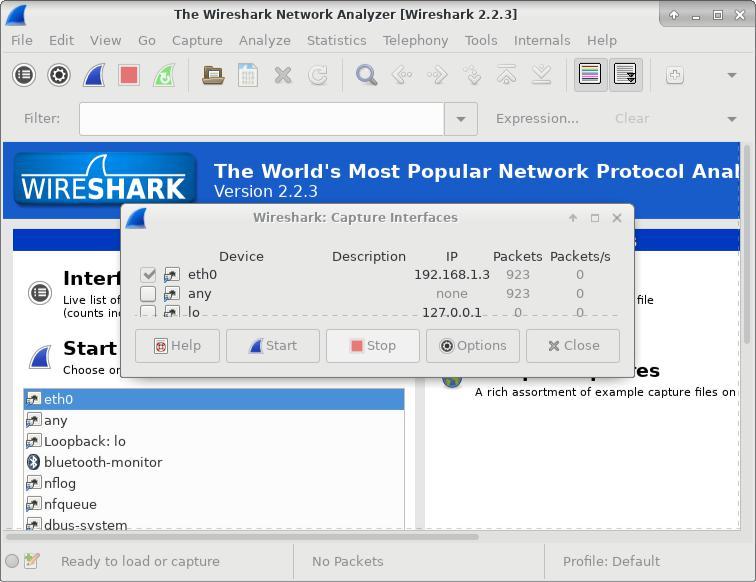
Step4: Start the capture process.
Step5: The wireshark displays several captured packets in color encoding and with several other details.
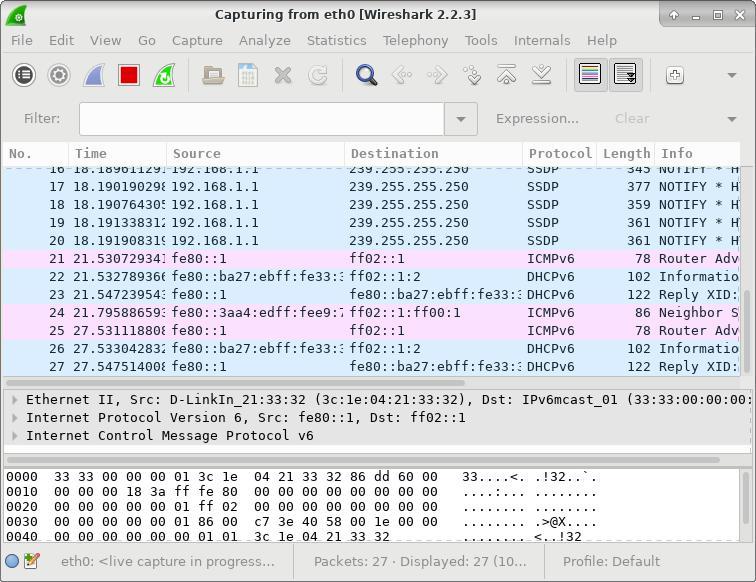
Step6: Filter out the TCP stream required to follow and look for sensitive information.
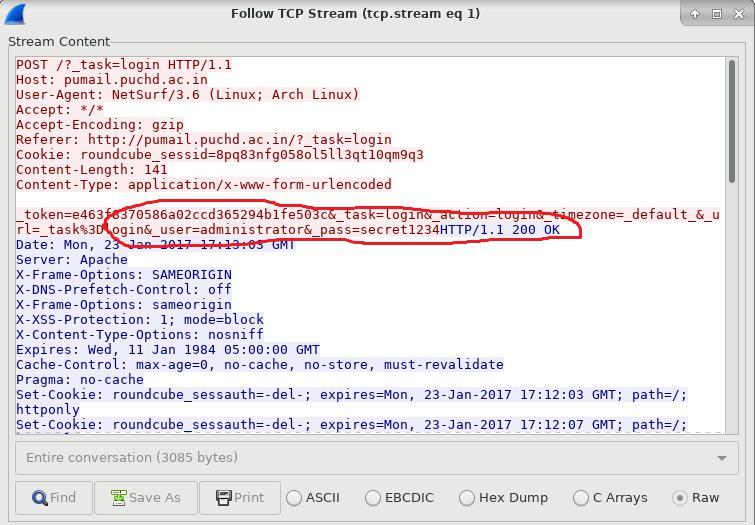
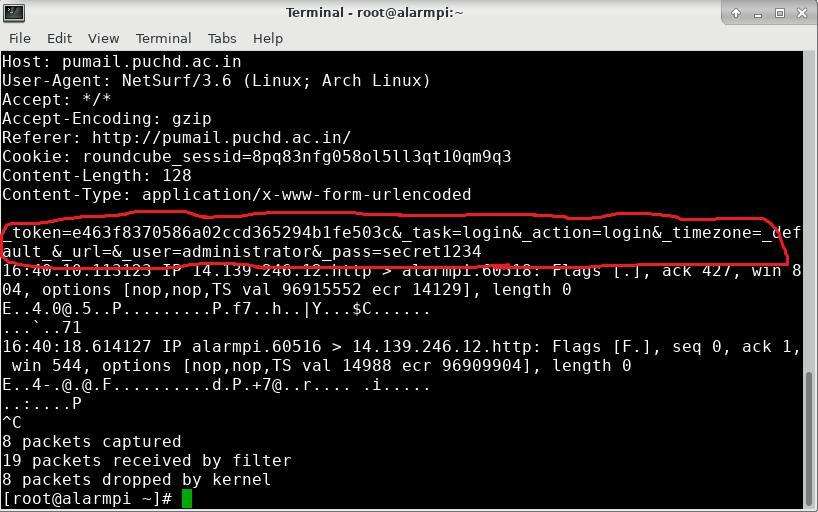
Here the sensitive login information is shown in pure text.
User: administrator
Password: secret1234Introduction: Tcpdump
Introduction:
Tcpdump is a common packet analyzer that runs under the command line. It allows the user to display TCP/IP and other packets being transmitted or received over a network to which the computer is attached. Distributed under the BSD license, tcpdump is free software.
Tcpdump works on most Unix-like operating systems: Linux, Solaris, BSD, macOS, HP-UX, Android and AIX among others. In those systems, tcpdump uses the libpcap library to capture packets. The port of tcpdump for Windows is called WinDump; it uses WinPcap, the Windows port of libpcap.
Privileges required:
In some Unix-like operating systems, a user must have superuser privileges to use tcpdump because the packet capturing mechanisms on those systems require elevated privileges. However, the -Z option may be used to drop privileges to a specific unprivileged user after capturing has been set up. In other Unix-like operating systems, the packet capturing mechanism can be configured to allow non-privileged users to use it; if that is done, superuser privileges are not required.
Common uses:
Tcpdump prints the contents of Network packets. It can read packets from a network interface card or from a previously created saved packet file. Tcpdump can write packets to standard output or a file.
It is also possible to use tcpdump for the specific purpose of intercepting and displaying the communications of another user or computer. A user with the necessary privileges on a system acting as a router or gateway through which unencrypted traffic such as Telnet or HTTP passes can use tcpdump to view login
IDs, passwords, the URLs and content of websites being viewed, or any other unencrypted information.
The user may optionally apply a BPF-based filter to limit the number of packets seen by tcpdump; this renders the output more usable on networks with a high volume of traffic.
Setup and Working of Tcpdump:
Step1: Tcpdump can be downloaded typing command in Terminal
“ pacman –S tcpdump ”
Step2: Tcpdump operates directly from the terminal. List all the interfaces using command
“ tcpdump –D ”
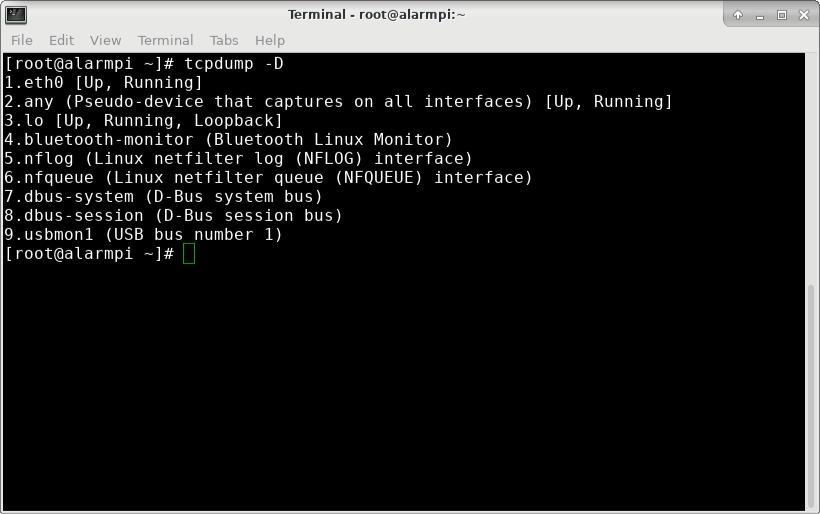
Step3: Start sniffing on port 80 to sniff valuable information using
“ tcpdump –A port 80 ”
Introduction: OpenVAS
Introduction:
The Open Vulnerability Assessment System (OpenVAS) is a framework of several services and tools offering a comprehensive and powerful vulnerability scanning and vulnerability management solution. The actual security scanner is accompanied with a regularly updated feed of Network Vulnerability Tests (NVTs), over 47,000 in total (as of June 2016).
All OpenVAS products are Free Software. Most components are licensed under the GNU General Public License (GNU GPL).
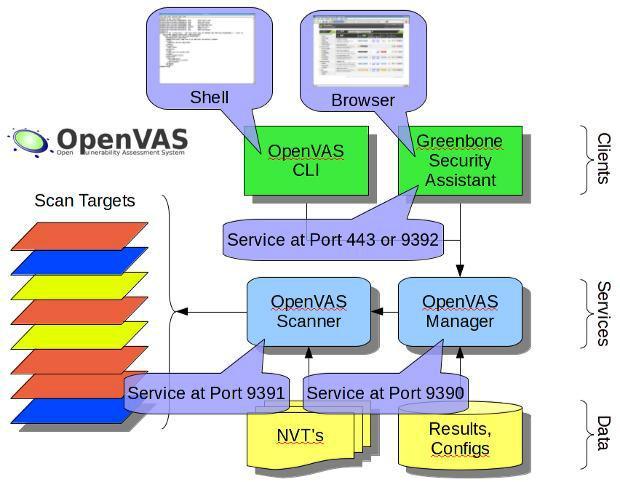
The Open Vulnerability Assessment System (OpenVAS) is a framework of several services and tools. The core of this SSL-secured service-oriented architecture is the OpenVAS Scanner. The scanner very efficiently executes the actual Network
Vulnerability Tests (NVTs) which are served via the OpenVAS NVT Feed or via a commercial feed service.
The OpenVAS Manager is the central service that consolidates plain vulnerability scanning into a full vulnerability management solution. The Manager controls the Scanner via OTP (OpenVAS Transfer Protocol) and itself offers the XML-based, stateless OpenVAS Management Protocol (OMP). All intelligence is implemented in the Manager so that it is possible to implement various lean clients that will behave consistently e.g. with regard to filtering or sorting scan results. The Manager also controls a SQL database (sqlite-based) where all configuration and scan result data is centrally stored. Finally, Manager also handles user management includiung access control with groups and roles.
Different OMP clients are available: The Greenbone Security Assistant (GSA) is a lean web service offering a user interface for web browsers. GSA uses XSL transformation stylesheet that converts OMP responses into HTML.
OpenVAS CLI contains the command line tool "omp" which allows to create batch processes to drive OpenVAS Manager. Another tool of this package is a Nagios plugin. Most of the tools listed above share functionality that is aggregated in the OpenVAS Libraries. The OpenVAS Scanner offers the communication protocol OTP (OpenVAS Transfer Protocol) which allows to control the scan execution. This protocol is subject to be eventually replaced and thus it is not recommended to develop OTP clients.
Setup and Working of OpenVAS:
Step1: Download and install the OpenVAS using the command in terminal
“ pacman –S openva ”
Step2: Configure the openvas according to official documentation at
Step3: Start the scanner service:
“ openvassd ”
“ systemctl start openvas-scanner ”
Step4: Start openvasmd to listen to a port and IP address
“ openvasmd –p 9390 –a 127.0.0.1 ”
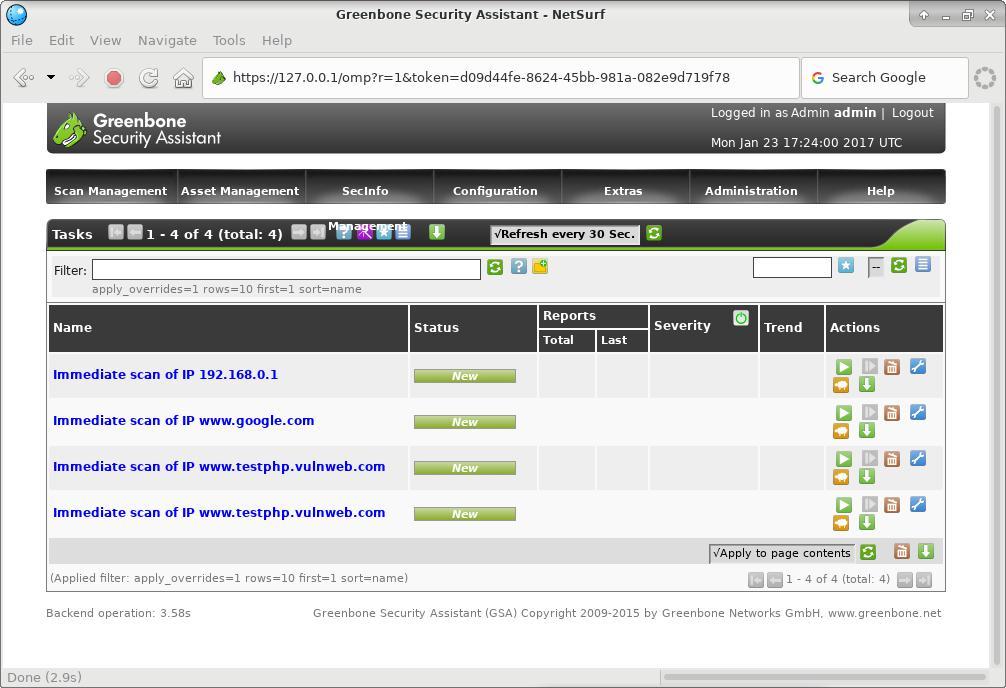
Step5: After this start the Greenbone security assistant using gsad command.
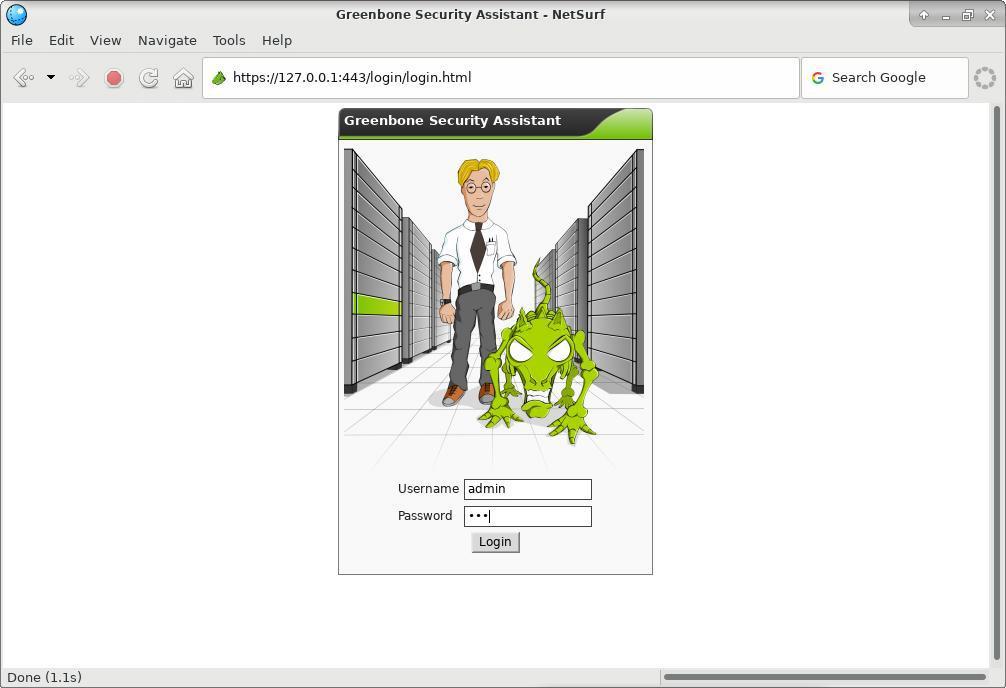
Step6: Login using your login credentials.
Conclusion
In this report we documented the attack vectors of exploits conducted using Raspberry Pi device. The Secure-PI device can be efficiently used for penetration testing and tools which it can support are not limited to those documented here.
If we can efficiently harness the power of this miniature device it can be utilized as an economic and stealth pentesting device to compromise target networks and web applications.
References
