Cardboard Raspberry PI Tablet #3DThursday #3DPrinting
cameron coward shares:
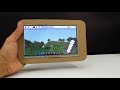
The process is simple enough for anyone to follow along with: just trace the screen and cut it out. Josh uses hot glue to layer the cardboard, and to attached the components to the back of the display. This is a fantastic way to quickly build a functional prototype, and gives you something to reference if you decide to actually create a CAD model for 3D printing or CNC machining.
read more on: https://blog.hackster.io/build-yourself-a-cardboard-framed-raspberry-pi-tablet-for-under-60-492b55fafa3a

Every Thursday is #3dthursday here at Adafruit! The DIY 3D printing community has passion and dedication for making solid objects from digital models. Recently, we have noticed electronics projects integrated with 3D printed enclosures, brackets, and sculptures, so each Thursday we celebrate and highlight these bold pioneers!
Have you considered building a 3D project around an Arduino or other microcontroller? How about printing a bracket to mount your Raspberry Pi to the back of your HD monitor? And don’t forget the countless LED projects that are possible when you are modeling your projects in 3D!
The Adafruit Learning System has dozens of great tools to get you well on your way to creating incredible works of engineering, interactive art, and design with your 3D printer! If you’ve made a cool project that combines 3D printing and electronics, be sure to let us know, and we’ll feature it here!
from Adafruit Industries – Makers, hackers, artists, designers and engineers! https://ift.tt/2r04qKU
via IFTTT