How To Create A Custom WordPress Document Library For Your Site
Searching for a solution to create a WordPress document library?
Unfortunately, WordPress doesn’t really have any core functionality to create a scenario where visitors are able to browse, filter, and/or download documents like PDFs, images, etc.
But – as is often the case with WordPress – a WordPress document library plugin can step in to save the day and help you create something like this:

In this post, I’m going to show you step-by-step how you can create your own flexible WordPress document library like the example above. Or, because this method is so flexible, you’ll also be able to tweak it as needed to include more information or make things even more stripped down.
To get it done, all you’ll need is a little bit of your time and $79 from your wallet – I’ll show you how to do everything else!
Why We’ll Use Posts Table Pro As A WordPress Document Library Plugin
Posts Table Pro is the premium plugin that’s going to take that $79 from your wallet.
It lets you display any content from your WordPress site as a table. I know – it sounds pretty simple. But that’s actually all you need to create a WordPress document library – even if you have thousands of documents!
With Posts Table Pro, you’ll be able to:
- Control exactly what information displays in your library. For example, you can add a document reference number, publication year, or anything else.
- Include sort and filtering options. For example, you can let users filter by document tags or categories.
- Add an AJAX search form. You can let visitors search your document library without even having to reload the page.
- Use lazy loading or pagination. Depending on how large your library is, you might want to split it up into multiple pages or use lazy loading for performance reasons.
- Create separate document libraries for different categories. If needed, you can create multiple separate document libraries and use detailed include/exclude rules to control exactly which files show up in each library for easy WordPress document management.
Basically, it’s going to let you create a document library that’s totally unique to your needs, rather than forcing you into a pre-configured setup like some of the other WordPress document management solutions you might find.
Ok, hopefully, I’ve convinced you that it’s at least worth checking out the rest of this tutorial. Now, let’s get into the hands-on part and I’ll actually show you step-by-step how to go about setting up your own WordPress document library.
Step-By-Step: How To Create A WordPress Document Library
There are three core parts to creating your document library:
- Use the free Pods plugin to create a custom post type for your documents
- Add your files to that custom post type using the WordPress interface
- Use the Posts Table Pro shortcode to display your document library on the front-end
Here’s how to perform each part in detail…
Part 1: Create A Custom Post Type For Your Documents
To get started, install and activate the free Pods plugin from WordPress.org. Pods is a popular solution that makes it easy to create and manage custom post types, as well as associated custom fields and custom taxonomies.
Basically, it will make it easy for you to house your documents and all the associated information (like a download link, reference number, etc.).
If you’re already familiar with custom post types, custom fields, and custom taxonomies, you can also use your own preferred solution. There’s nothing unique about Pods beyond it being what I’ll use in this tutorial.
Step 1: Use Pods To Create A Custom Post Type
Once you’ve installed and activated the plugin, go to Pods Admin → Add New in your WordPress dashboard. Then, choose the option for Create New:
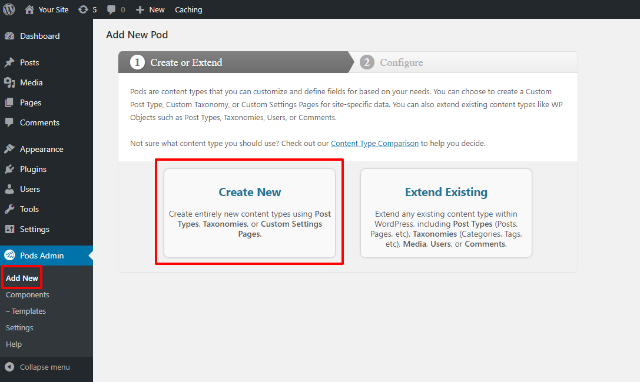
Make sure the Content Type is set to the default Custom Post Type. Then, enter a singular and plural label. The actual name isn’t especially important because your visitors won’t see it, but using something like “Document” and “Documents” is a good default. Then, click Next Step:

And congratulations! You just created your very own WordPress custom post type. That wasn’t too difficult, right?
You should see a new Documents option in your WordPress dashboard sidebar:

Step 2: Add Necessary Custom Fields
Now, you have a basic “container” where you can upload and store all of your documents. But if you’re like most people who want to create a WordPress document library, there’s a good chance you’ll want to include extra information about your documents, as well as a direct link to download your documents.
To do that, you’ll use custom fields and custom taxonomies:
- Custom fields are good for information that’s 100% unique to a document, like its reference number, file size, etc.
- Custom taxonomies are like regular WordPress categories and tags. They’re helpful for grouping your documents together and making them easier to filter (I’ll cover taxonomies in the next step).
No matter what, you’ll need to create at least one custom field for your file’s download link. To do that, click on Add Field in the Edit Pod interface. That will open a new interface where you can configure the field. Here’s how to configure it:
- Label: Download
- Name: download (Pods will automatically generate this after you enter the label)
- Field Type: WYSIWYG (Visual Editor)

And then, to save time when you upload your files, a neat trick is to go to the Advanced tab and make the Default Value “Download”. While this might not make sense right now, I promise that it will save you time when you upload your documents in the next part. Once you do that, click Save Field:

For technical users, here’s a neat, and entirely optional, trick. If you want to use buttons for your download links instead of plain text, you can use an HTML field instead and set the default value equal to the HTML for your button link.
That’s the only custom field you have to add. But if you want, feel free to create additional fields for:
- Document reference number
- File size
- File type (you can also use a custom taxonomy if you want people to be able to filter by file type)
- Anything else you want to include in your document library!
Once you finish adding custom fields, make sure to click Save Pod.
Step 3: Add Custom Taxonomies (If Needed)
Like you learned above, custom taxonomies work exactly like regular WordPress categories and tags. You can use them to group your files together by common traits.
You do not need to use them to create a working WordPress document library, but they can make your document library more usable, especially if you have lots of files.
For example, you could use custom taxonomies to organize by:
- Topic – for example, “Warranty Information”, “Manuals”, “Spec Sheets” etc.
- File type – if you have different file types, you can let users quickly filter by PDF documents vs images.
- Author – if each document has a specific author (if you have lots of authors that are only associated with a single document, it might be better to use a custom field for this).
And you might have your own unique categories, as well.
To create a custom taxonomy, go to Pods Admin → Add New. Then click Create New like before. Only now, choose the Custom Taxonomy content type and give it a singular and plural label. Then, click Next Step:

Then, go to the Advanced Options tab. If you want your custom taxonomy to function like a…
- Category, then leave the Hierarchical box checked
- Tag, then uncheck the Hierarchical box
Then, click Save Pod:

Repeat the process for any other custom taxonomies you want to use.
Once you’ve created all the custom taxonomies you want to use:
- Go back to the Edit Pod interface for your documents custom post type
- Click on the Advanced Options tab
- Scroll down to the Built-in Taxonomies section
- Check all the custom taxonomies that you just created
- Click Save Pod

Part 2: Add Your Documents To The Custom Post Type
Now, it’s time to add your documents to the custom post type that you created. This is pretty simple – it’s just like writing a regular WordPress blog post!
Go to Documents → Add New in your WordPress dashboard. You should see what looks like the regular WordPress Editor.
Here’s how to properly upload a document:
- Put the document’s title in the regular Title Area
- Add a short description for the document in the regular post editor area (if desired)
- Enter the custom taxonomies in the sidebar (if you’re using any)

Then, click on the normal Add Media button (just as if you were adding an image to a blog post) and upload your document to the WordPress media library.
Once the upload completes, copy the direct URL to the file:

Then, exit the Add Media interface and scroll down in the WordPress editor. Below the regular text editor, you should see all of the custom fields that you added.
To create your download link, use the WYSIWYG editor to insert the direct link to the file:

If you have any other custom fields, make sure to fill those out as well. Then, Publish your document.
Now, you just need to repeat the process to add all the documents you want to include in your document library.
If you have thousands of documents, you might want to purchase something like WP All Import or another CSV import plugin to save time.
Part 3: Use Posts Table Pro To Create Your Document Library
Almost at the finish line! Now, you just need to use Posts Table Pro to create your front-end document library.
To configure Posts Table Pro, go to Settings → Posts Table Pro. In this interface, you can configure the default settings for the Posts Table Pro shortcode (you can always override these settings manually using shortcode parameters):

You can configure settings using that graphic interface if you want, but I’m just going to skip straight to giving you some pre-configured shortcodes because it’ll save you some time.
You can also read this Posts Table Pro help article for a full list of all the shortcode options.
To create the skeleton of the document library from the example at the beginning of this article, you’d just use this:
[posts_table columns=”title,content,tax:document_category,tax:file_type,cf:download_link” links=”none” post_type=”document” sort_by=”title”]

Depending on the custom fields and custom taxonomies that you used, you might need to customize the columns list a bit. For…
- Custom fields – use cf: followed by the name of the custom field
- Custom taxonomies – use tax: follow by the name of the custom taxonomy
You can find the names for both in the Pods interface:

And if you want to use buttons for the download links like my example, you just need to add the CSS for the button class in the WYSIWYG editor.
After adding the button CSS, here’s the final example:
If you want to go even further with your WordPress document library, the Posts Table Pro documentation explains how to control things like:
And that wraps up my guide on how to use Posts Table Pro as a WordPress document library plugin!
Have any other questions about creating a document library like this? Let us know in the comments!