How to Take a Screenshot for Your Blog Posts (Beginner’s Guide)
Do you want to add a screenshot to your blog post, but not sure of the best way to do it? Screenshots allow you to share an image snapshot of your desktop or mobile screen in your blog posts. In this article, we will show you how to take a screenshot for your WordPress blog posts.

Taking a Screenshot for Your Blog Posts
Since there are so many different ways to take a screenshot, we have created a step-by-step guide on how to take a screenshot on different devices and apps. To make it easy for you, we have also created a table of contents below, so you can quickly find the method that’s more applicable to you.
- How to Take a Screenshot Using CloudApp
- How to Take a Screenshot on Mac
- How to Take a Screenshot on Windows
- How to Take a Screenshot on Chromebook
- How to Take a Screenshot on iPhone
- How to Take a Screenshot on Android Phone
Ready, let’s get started!
How to Take a Screenshot Using CloudApp
CloudApp is a popular screen capture app in the market. It allows you to easily take a screenshot of your computer and share. CloudApp automatically saves the link of a screen capture in the clipboard which means you can manage all your screenshots and share them on any platform including WordPress.
It works great with Mac and Windows devices to quickly capture a selected area or entire screen. CloudApp also integrates with all the popular communication apps like Slack, Asana, Trello, and more.
Mac users, can press ‘Command + Shift + 5’ to capture the screenshots, and Windows users can press ‘Alt + Shift + 5’ to take a screenshot with CloudApp.
You’ll also see the live size in the bottom left corner while capturing a screenshot. It will help you take a screenshot of the exact size that you need.

CloudApp also allows you to create a video screencast, so you can create quick tutorials with audio. Simply click on the CloudApp icon in your browser’s menu bar and select the TV icon to record your screen.
![]()
Next, you need to click and drag the crosshair (pointer) to record a specific part of the video.
It’ll display a menu bar below your selected area. Simply click on the microphone icon to start recording the audio and then click on the ‘Start’ button.
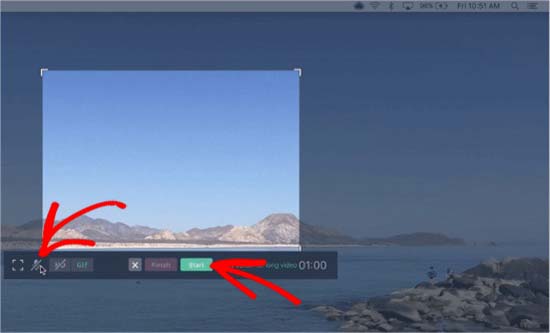
Once you’re done with recording, click on the ‘Finish’ button and your recorded file link will be saved in the clipboard automatically.
CloudApp is a freemium app, and it’s by far the fastest way to capture and share screenshots. We use it across our entire company to help with productivity and collaboration.
However if you don’t want to use the CloudApp, then you can also take a screenshot on different devices using the native functionality.
How to Take a Screenshot on Mac
If you’re using a Mac device and want to take a screenshot, then there are several options for it.
In the Mac devices, you can capture the entire screen, selected portion of your screen, a specific window, and more.
To take a screenshot of the entire screen on a Mac device, simply press ‘Shift + Command + 3’ and it’ll capture your screen.
If you want to capture a selected portion, then press ‘Shift + Command + 4’. Next, click and drag the crosshair (pointer) to take a screenshot of the selected area.

If you want to take a screenshot of a specific window, then press ‘Shift + Command + 4’ and also press the ‘Space bar’ on your keyboard. You’ll see that the pointer will change into a camera icon. Simply drag the camera icon on a window to highlight and capture it.
Note: All apps may not allow you to take the screenshot of their window. In that case, you can take a screenshot of the selected portion and crop it.
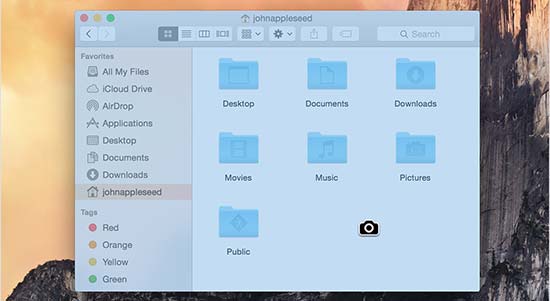
By default, all the screenshots will be saved on your desktop with the capturing time / date as filename and .png as file extension.
How to Take a Screenshot on Windows
To take a screenshot on your Windows devices, you’ll need to press the ‘Ctrl + PrtSc’ keys. This will capture the entire screen.
Next, you can open this screenshot in an image editing software like Adobe Photoshop to crop the required area and save it on your computer.
If you’re running Windows 10, then you can also use the new Snipping tool to easily take the screenshots. Snipping tool allows you to capture specific part of your screen and automatically save it to clipboard.
You can press ‘Windows + Shift + S’ keys to start taking a screenshot with the Snipping tool. Next, click and drag the pointer to select an area on your screen. It will capture the screenshot automatically as you leave the right click.

Since the screenshot is saved to clipboard, you can paste it on any image editing software like Adobe Photoshop for further changes and then save it on your computer.
How to Take a Screenshot on Chromebook
In Chromebook, you can either take a screenshot of your entire screen or a selected area. Press the ‘Ctrl + Switch Window’ keys to capture your full screen.
Note: If you’re using Chrome OS 64.0.3282.134 or later, then you can simply press the ‘Power + Volume Down’ buttons to capture your entire screen.
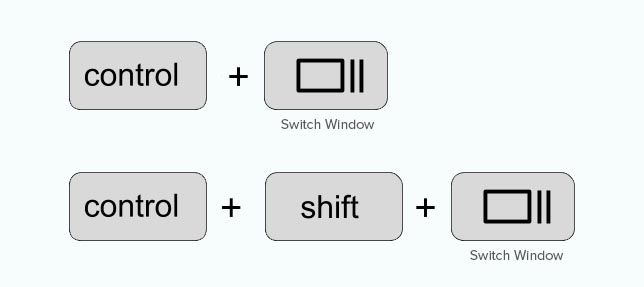
To take a screenshot of a selected area, you need to press ‘Ctrl + Shift + Switch Window’ keys. Then click and drag the crosshair (pointer) to select the area that you want to capture.
Upon leaving the click, you’ll see a notification on the bottom right corner of your screen that shows your screenshot is saved in the ‘Downloads’ folder.
If you’re using a Chromebox with an external (general) keyboard attached to it, then press ‘Ctrl + F5’ to take a screenshot. F5 key will functions the same as the ‘Switch Window’ key on a Chromebook.
How to Take a Screenshot on iPhone
Taking a screenshot on smartphones is actually quite simple
If you’re using an iPhone X, then you need to open your blog posts or the app on the screen. Press the ‘Side’ button on the right side and ‘Volume Up’ button on the left side of your phone.
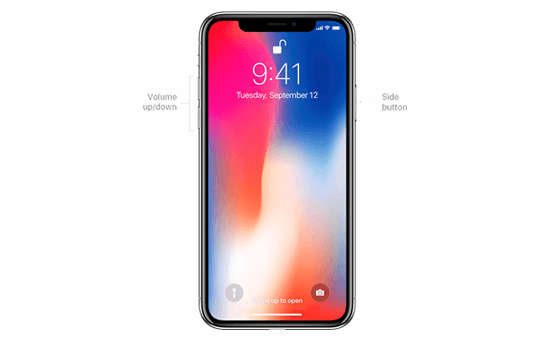
Make sure that you press both the buttons at the same time. It will take a screenshot of the screen and save it to ‘Screenshots’ folder in your photos.
If you’re using an iPhone 8 or earlier models, then open the screen that you want to capture on your smartphone. Simply press the ‘Power + Home’ buttons at the same time to take a screenshot.
How to take a screenshot on Android Phone
There are many different phone manufacturers that sell smartphones with Android OS (such as Samsung Galaxy, Motorola, Google Pixel, etc). However most new devices follow the same universal process to take a screenshot.
On your Android phone, you need to open the screen that you want to capture. Next, press the ‘Power + Volume Down’ buttons together.
It’ll take the screenshot and save it in your photo gallery.
That’s all. We hope this article helped you learn how to take a screenshot for your blog posts. You may also want to see our guide on tools to create better images for your blog posts.
If you liked this article, then please subscribe to our YouTube Channel for WordPress video tutorials. You can also find us on Twitter and Facebook.
The post How to Take a Screenshot for Your Blog Posts (Beginner’s Guide) appeared first on WPBeginner.
source https://www.wpbeginner.com/beginners-guide/how-to-take-a-screenshot-for-your-blog-posts/