How to Make a Captive Portal of Death by Trevor Phillips
You do it. I do it. Everyone does it without thinking.
You connect your phone to that “Free Public Wi-Fi” at the airport or coffee shop without a second glance, even if your phone warns you that it’s an “unsecure” network. Sometimes you are faced with a captive portal: one of those annoying pop-ups that asks you to sign in or accept the Terms & Conditions before you can connect.
With just a few pieces of equipment, you can make your own “Free Public Wi-Fi” (or whatever you want to name it) with any page you could imagine as your captive portal.
Hopefully, after seeing how easy it is to get this set up, you will be more cautious before entering credentials or personal data into a Wi-Fi network’s captive portal.
Equipment
Here’s the equipment I am using for this bad boy:
- Raspberry Pi Zero with an image of Raspbian OS
- USB Hub to increase range of the Wi-Fi dongle (so that it doesn’t rely on the 5V supply directly from the Pi)
Creating a Hotspot
1. hostapd (Host Access Point Daemon)
On your Raspberry Pi, install hostapd and configure /etc/hostapd/hostapd.conf like so:
interface=wlan1
ssid=YOUR_NETWORK_NAME_HERE
hw_mode=g
channel=11
macaddr_acl=0
Enable hostapd every time the Pi boots:
$ sudo systemctl enable hostapd
Then set DAEMON_CONF="/etc/hostapd/hostapd.conf" in the file /etc/default/hostapd.
- hostapd will start every time the Pi boots
- It will try to use the interface
wlan1. This is the interface your Wi-Fi dongle is using. For me, it’swlan1.
- Hardware mode
grefers to IEEE 802.11g (2.4 GHz).
channel=11is somewhat arbitrary. There are 14 channels in the 2.4 GHz band.
macaddr_acl=0means the Access Control List will accept everything unless it’s specifically in the deny list.
2. DHCP Server (Dynamic Host Configuration Protocol)
Install isc‐dhcp‐server and edit the file /etc/dhcp/dhcpd.conf. Uncomment the line:
# autoritative
Now add this to the end of the file:
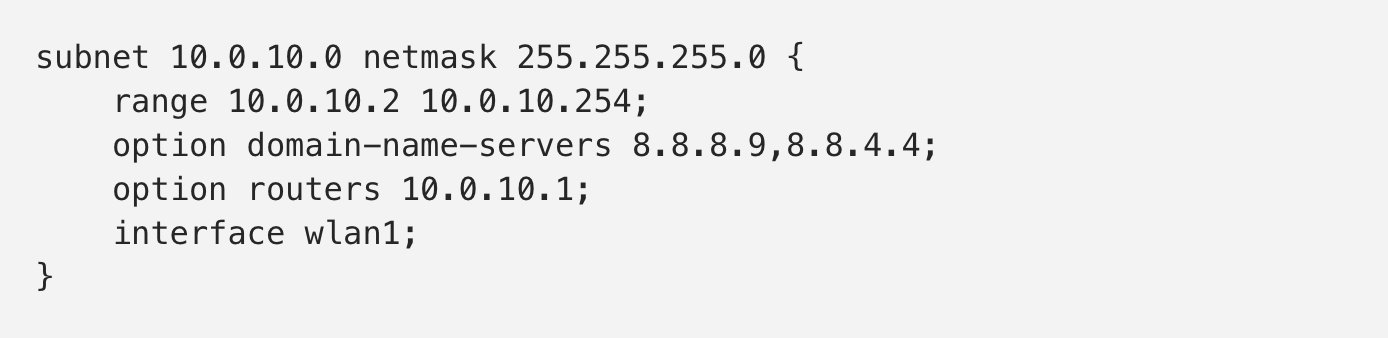
This means that clients who connect to the network will receive IP addresses between 10.0.10.2-254. The router (Raspberry Pi) IP address is 10.0.10.1. The first 24 bits of the IP address are part of the network portion of the address, leaving the remaining 8 out of 32 bits for hosts on the hotspot. The IP addresses 8.8.8.9 and 8.8.4.4 are simply Google’s DNS servers.
3. Configure network interfaces
Modify the file /etc/network/interfaces for wlan1.
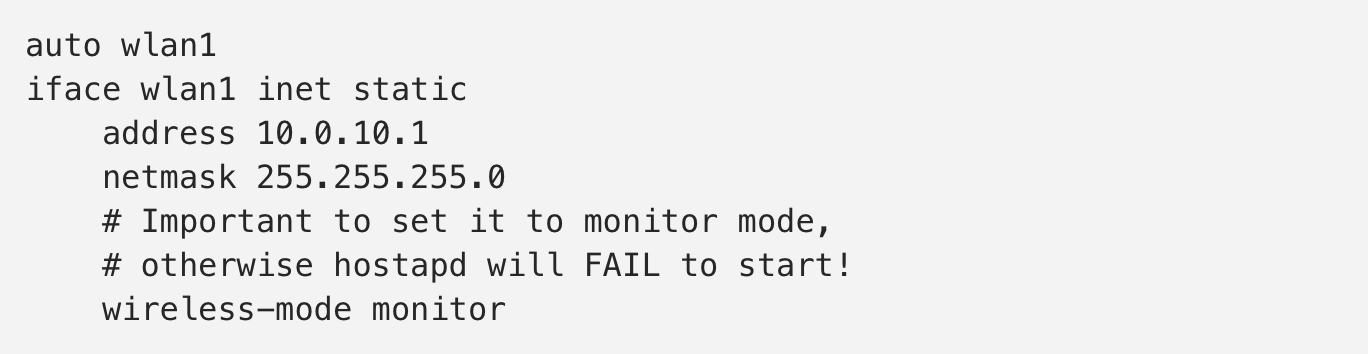
Note that auto INTERFACE means to start the interface on boot. Next, uncomment

in the file /etc/sysctl.conf.
4. Configure iptables
Run the command
$ sudo iptables ‐t nat ‐A POSTROUTING ‐o wlan0 ‐j MASQUERADE
-t nat→ use the NAT table (Network Address Translation)-A POSTROUTING→ (or--append) alter packets as they are about to go out
-o wlan0→ (or--out-interface) chained with-Aoption to specify the interface via which a packet is going to be sent (use the Raspberry Pi’s main, normal interface which should have an Internet connection via another network)
‐j MASQUERADE→ allows routing traffic without disrupting the original traffic
Then persist iptables simply by running the command
$ sudo apt‐get install iptables‐persistent
If you need to re-save the iptables configuration, do it like this:

5. Save and reboot
$ sudo shutdown -r now
Creating a Captive Portal
1. nodogsplash
For this, we’re going to use the open source project nodogsplash. Its documentation states that it is “a Captive Portal that offers a simple way to provide restricted access to the Internet by showing a splash page to the user before Internet access is granted.”
I used version 3.0, so I can’t guarantee that this will work if you use another version. After cloning the Git repo, run git checkout v3.0.0 to checkout the same version.
Edit the file /etc/nodogsplash/nodogsplash.conf with the contents from this Gist. To understand all of the settings, I recommend reading the documentation. But in brief:
- It will use interface
wlan1, the interface that the Wi-Fi dongle is using.
- It’s important to allow pre-authenticated users to have access to port 53 in order for their device to resolve DNS (*more on that below).
- We are also using Forwarding Authentication Service (FAS) listening on port 8000, for reasons described below.
Why do pre-authenticated users need to have access to port 53? When a computer or mobile device connects to a Wi-Fi network, there is often a built-in mechanism to detect a captive portal and launch a native browser to accept Terms & Conditions. For example, an iPhone launches a request to http://captive.apple.com and checks if the response is “Success.” If it is not“Success” then the phone knows it needs to go through a captive portal. Without port 53, the device is unable to resolve DNS and get a response on whether it has a successful connection or not.
2. FAS
FAS is the meat of the captive portal. Here is where you craft your special website or webpage that the user must go through before receiving Internet access. It can be anything: an image of hairy monkeys eating grapes, a Terms & Conditions page, or something more malicious like a login page which looks identical to that of a popular website. This can be especially devious if you give the Wi-Fi hotspot a name relevant to the popular website you are emulating. And not legal, so don’t do it! And don’t put credentials into a public Wi-Fi captive portal!
Not only can the webpage look like anything, you can also make it with pretty much anything that will run on the Raspberry Pi (which is now acting as a server). That means HTML+CSS+Javascript, Angular, Ruby on Rails, node.js, etc. For this example, I chose Python-Flask.
The Python server is configured to listen on port 8000, because this is the port we specified in the nodogsplash configuration. When a user enters the captive portal, he will be served the index (/) page of the Python-Flask server. nodogsplash will send ?tok=XXX&redir=YYY to the index page, via optional parameters in the URL. After you’ve done… whatever it is you wanted to do… the user should be redirected to http:// where the values of tok and redir are the same as those passed in the initial URL. After nodogsplash receives this GET request, it understands that the user has been granted Internet access.
nodogsplashIP should be the IP address of the router (the Pi) and if you are using my configuration file, nodogsplashPORT should be 2050.
Tips for doing this on the Raspberry Pi
Commands
lsusb→ show attached USB devices
lsmod→ show loaded kernel modules and generally useful system information
dmesg→ show system messages
lshw→ show hardware information
wpa_cli→ initiate a command-line tool to setup/scan Wi-Fi networks (especially useful if you are connecting to the Pi via SSH)
Random stuff
You can add commands in /etc/rc.local to run them at boot. Be warned that if one command fails, the script will exit, so the subsequent commands will not execute.
Place an empty file named ssh in the boot partition of your SD card, to auto-enable SSH (note that it is important to have dtoverlay=dwc2 in the config.txt file).
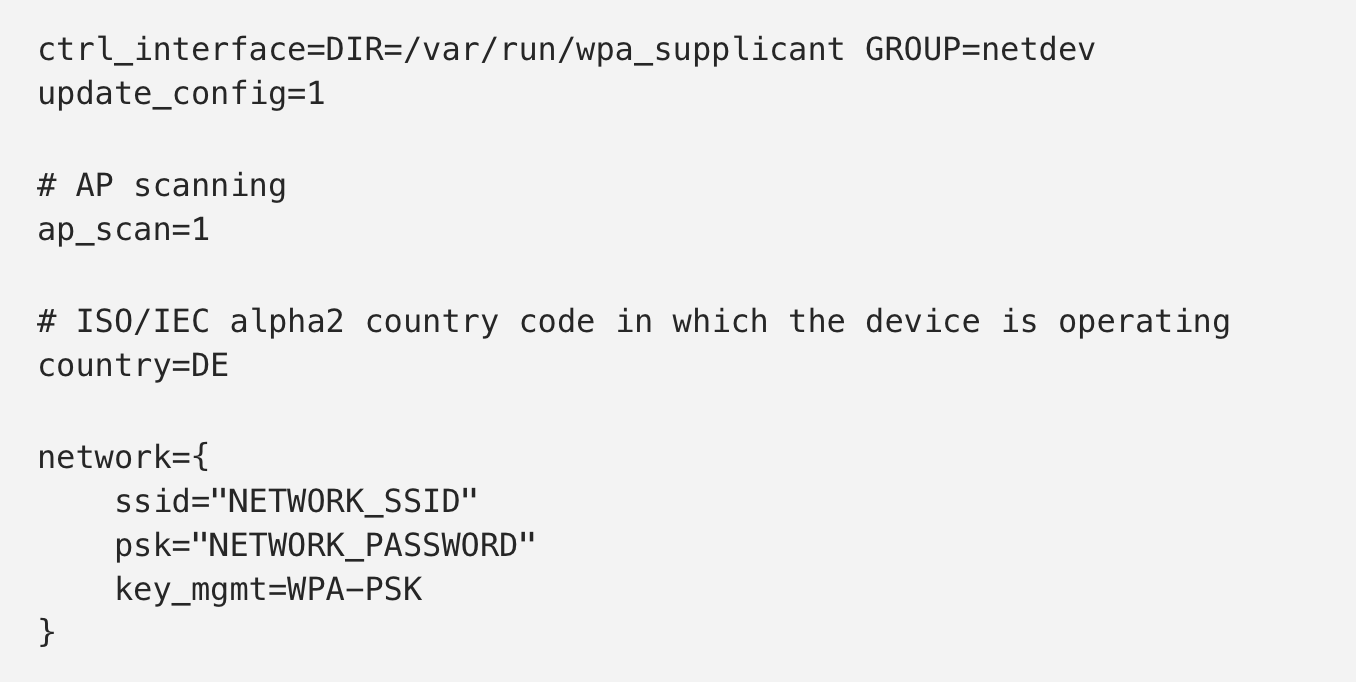
You can also make a file named wpa_supplicant.conf in the boot partition of your SD card to automatically connect to a network. An example is below:
Originally posted at: https://medium.com/bugbountywriteup/how-to-make-a-captive-portal-of-death-48e82a1d81a
The post How to Make a Captive Portal of Death by Trevor Phillips appeared first on Hakin9 - IT Security Magazine.
from Hakin9 – IT Security Magazine http://bit.ly/2Fkw8eJ