Using dummy-hcd on Linux to play with USB gadgets
Andrzej Pietrasiewicz
June 24, 2019
In this article, I promised to tell you how to use dummy_hcd, which consists of a software-emulated host controller and a UDC chip. In other words, this means you can play with USB gadgets even if you don't have the appropriate hardware, because your PC can act as both a USB host and a USB device.
Of course we also need some gadget to run, so why don't we use cmtp-responder? You might also want to read about USB gadgets here and here. The description will be Debian-based, so for other systems you need to adjust it accordingly.
Dependencies
We will need a bunch of packages:
gcc | # we need a compiler to compile anything |
g++ | # to satisfy cmake the easy way, but otherwise not used) |
libconfig-dev | # libusbgx and gt need libconfig |
cmake | # gt and cmtp-responder use cmake to generate Makefiles |
git | # we will be cloning from git.kernel.org and github.com |
autoconf | # libusbgx needs it |
libtool | # libusbgx needs it |
asciidoc-base (for a2x) | # gt builds its manpage with it |
libncurses-dev | # compiling the kernel |
flex | |
bison | |
build-essential | |
fakeroot | |
libelf-dev | |
libssl-dev | |
bc | |
libglib2.0-dev | # gt needs it |
libsystemd-dev | # gt needs it |
usbutils | # for lsusb |
Run this:
apt-get install gcc g++ libconfig-dev cmake git autoconf libtool asciidoc-base libncurses-dev flex bison build-essential fakeroot libelf-dev libssl-dev bc libglib2.0-dev libsystemd-dev usbutils
 apt-get clean
Once complete, you can then install libusbgx and gt.
libusbgx:
git clone https://github.com/libusbgx/libusbgx.git
 cd libusbgx
 autoreconf -i
 ./configure --prefix=/usr
 make
 make install # as root
gt:
git clone https://github.com/kopasiak/gt.git
 cd gt/source
 cmake -DCMAKE_INSTALL_PREFIX= .
 make
 make install # as root
Unfortunately, the default kernel has neither ConfigFS nor dummy_hcd support turned on. Let's fix it!
The kernel
Ensure the following options are set in the kernel config:
CONFIG_CONFIGFS_FS=y # ConfigFS support
 CONFIG_USB=y # USB support
 CONFIG_USB_GADGET=y # USB gadget framework
 CONFIG_USB_DUMMY_HCD=y # dummy_hcd, our emulated USB host and device
 CONFIG_USB_CONFIGFS=y # composing USB gadgets with ConfigFS
 CONFIG_USB_CONFIGFS_F_FS=y # make FunctionFS a component for creating USB gadgets with ConfigFS
Compile and install the kernel your favorite way.
dummy_hcd
Thanks to the fact that we enabled the relevant bits of the kernel, we should have dummy_hcd up and running now. To confirm, do this:
ls -l /sys/class/udc
dummy_udc.0 should be there. If it is not, verify that all the previous steps have succeeded.
gt udc
This should also show dummy_udc.0.
Once dummy_udc.0 is there, your PC is ready to emulate USB gadget hardware!
ConfigFS
We have chosen to enable ConfigFS support. As recent Debian releases come by default with systemd, your ConfigFS should be automatically mounted by /lib/systemd/system/sys-kernel-coonfig.mount unit under /sys/kernel/config.
Thanks to the enabled USB gadget, and the presence of our virtual UDC, /sys/kernel/config should now contain usb_gadget directory. From this moment on gadgets can be composed, for example with the gt.
cmtp-responder
We will create an MTP device with cmtp-responder. When it runs, if you chose to install graphical desktop environment, you will be able to click on its icon and use it as if it were, for example, the storage space of a connected smartphone.
The instructions for cmtp-responder are here, but I provide a quick summary for you below:
git clone https://github.com/cmtp-responder/cmtp-responder.git
 cd cmtp-responder
 cmake -DBUILD_DESCRIPTORS=ON .
 make
 make install # as root
All the below as root:
mkdir /etc/gt/templates
 cp systemd/mtp-ffs.scheme /etc/gt/templates
 cp systemd/*.socket /etc/systemd/system
 cp systemd/*.service /etc/systemd/system
 cp systemd/*.mount /etc/systemd/system
 systemctl enable usb-gadget.service
 systemctl enable run-ffs_mtp.mount
 systemctl enable ffs.socket
Create /etc/systemd/system/usb-gadget.target if you don't have it in /lib/systemd/system:
[Unit]
 Description=Harware activated USB gadget
And create /etc/udev/rules.d/99-systemd.rules with the below contents if your /lib/udev/rules.d/99-systemd.rules does not contain the following line:
SUBSYSTEM=="udc", ACTION=="add", TAG+="systemd", ENV{SYSTEMD_WANTS}+="usb-gadget.target"
After reboot your cmtp-responder should activate automatically. You can verify its existence with lsusb (run as root):
Bus 001 Device 002: ID 1d6b:0100 Linux Foundation PTP Gadget
 Device Descriptor:
 bLength 18
 bDescriptorType 1
 bcdUSB 2.00
 bDeviceClass 0 (Defined at Interface level)
 bDeviceSubClass 0
 bDeviceProtocol 0
 bMaxPacketSize0 64
 idVendor 0x1d6b Linux Foundation
 idProduct 0x0100 PTP Gadget
 bcdDevice 5.01
 iManufacturer 1 Collabora
 iProduct 2 MTP Gadget
 iSerial 3 000000001
 bNumConfigurations 1
 Configuration Descriptor:
 bLength 9
 bDescriptorType 2
 wTotalLength 39
 bNumInterfaces 1
 bConfigurationValue 1
 iConfiguration 0
 bmAttributes 0x80
 (Bus Powered)
 MaxPower 2mA
 Interface Descriptor:
 bLength 9
 bDescriptorType 4
 bInterfaceNumber 0
 bAlternateSetting 0
 bNumEndpoints 3
 bInterfaceClass 6 Imaging
 bInterfaceSubClass 1 Still Image Capture
 bInterfaceProtocol 1 Picture Transfer Protocol (PIMA 15470)
 iInterface 4 Collabora MTP
 Endpoint Descriptor:
 bLength 7
 bDescriptorType 5
 bEndpointAddress 0x81 EP 1 IN
 bmAttributes 2
 Transfer Type Bulk
 Synch Type None
 Usage Type Data
 wMaxPacketSize 0x0200 1x 512 bytes
 bInterval 0
 Endpoint Descriptor:
 bLength 7
 bDescriptorType 5
 bEndpointAddress 0x02 EP 2 OUT
 bmAttributes 2
 Transfer Type Bulk
 Synch Type None
 Usage Type Data
 wMaxPacketSize 0x0200 1x 512 bytes
 bInterval 0
 Endpoint Descriptor:
 bLength 7
 bDescriptorType 5
 bEndpointAddress 0x85 EP 5 IN
 bmAttributes 3
 Transfer Type Interrupt
 Synch Type None
 Usage Type Data
 wMaxPacketSize 0x0040 1x 64 bytes
 bInterval 6
 Device Qualifier (for other device speed):
 bLength 10
 bDescriptorType 6
 bcdUSB 2.00
 bDeviceClass 0 (Defined at Interface level)
 bDeviceSubClass 0
 bDeviceProtocol 0
 bMaxPacketSize0 64
 bNumConfigurations 1
 Device Status: 0x0000
 (Bus Powered)
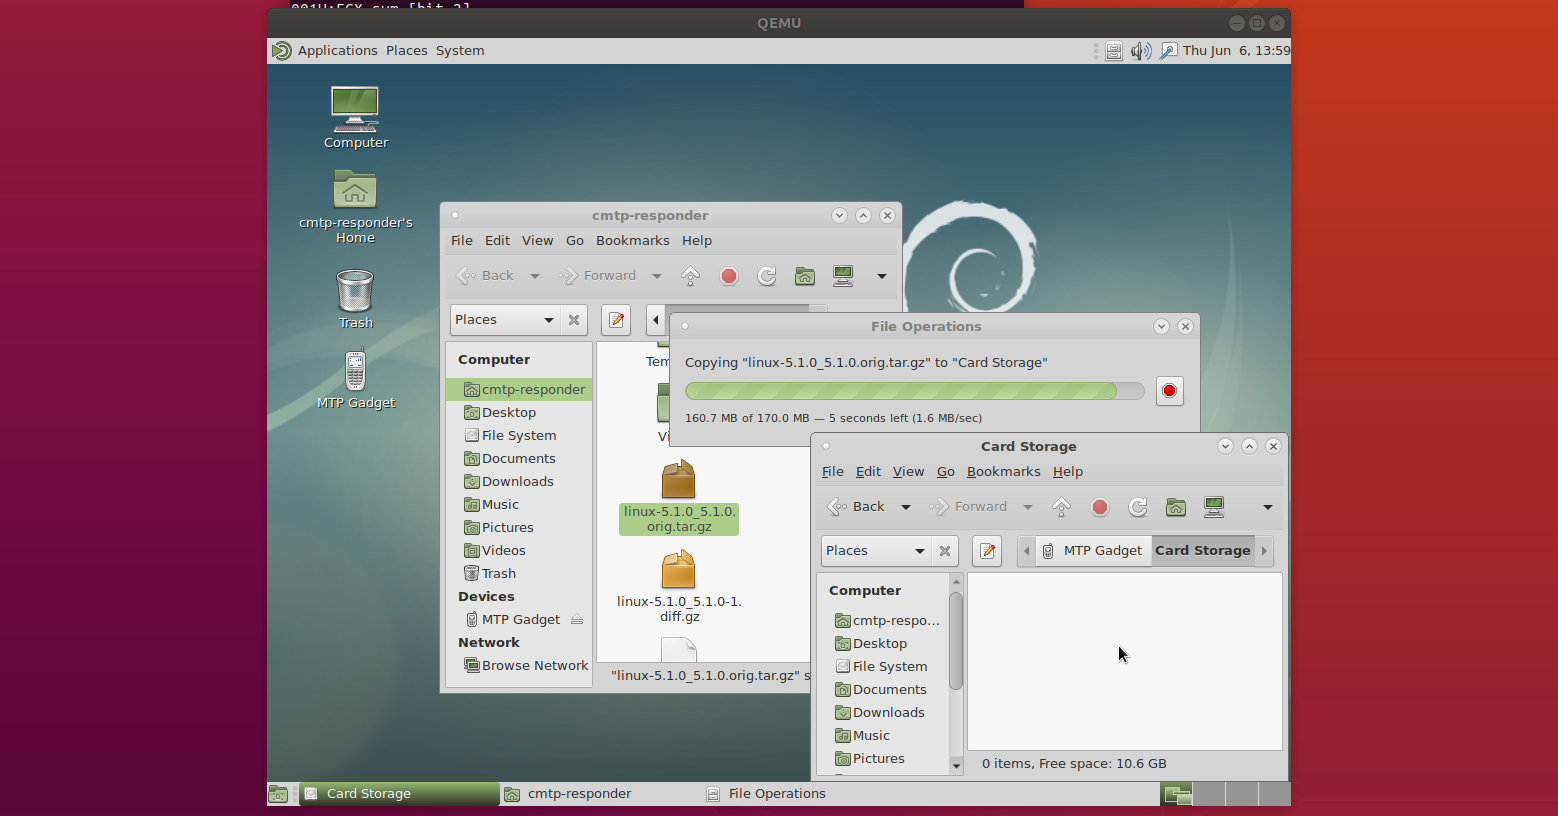
This screenshot illustrates copying a larger file to our MTP gadget.

The backing storage is /media/card, and can be configured at compile time in include/mtp_config_h (MTP_EXTERNAL_PATH_CHAR).
Happy playing with cmtp-responder!
In the next installment, I will tell you how to run it on real ARM hardware, so stay tuned.
from Hacker News https://ift.tt/2XG8Rga