How to Control Your PC with Google Assistant (Working)
[the_ad id='1307']
While Windows 10 already has Cortana as its voice assistant, many users prefer Google Assistant for its great number of features and powerful capability to adapt to any ecosystem. However, the sad part is that Google Assistant is not available on desktop computers except Chromebooks and that is disappointing. Nevertheless, you should not be disheartened as we bring you an in-depth guide on how to control your PC with Google Assistant. In this article, I have mentioned some nifty ways to manage your computer with any Android smartphone, Google Home, Mini, Nest Hub, etc. So without further ado, let’s go ahead and learn how to control your PC with voice commands.
1. Control Your PC with Google Assistant
Before we begin, let me outline the basic premise of this tutorial. We are using an Android smartphone to control a Windows 10 PC. And for that, we are using Pushbullet and IFTTT apps on the mobile device and Push2Run application on the computer. Push2Run has been developed by Rob Latour and it’s completely free to use. The app is designed for automating tasks using voice commands and it’s excellent at that. So here is the break down of our task flow: Voice command through Google Assistant -> IFTTT -> Pushbullet -> Push2Run on PC -> Final execution of the task on PC. Now that you have got the basic idea, let’s begin.
1. First and foremost, install both Pushbullet (Free) and IFTTT (Free) apps on your Android device. After that, log in with your Google account on both the apps and allow necessary permissions. Make sure, you are using the same Google account across all apps and platforms.
2. Next, open Pushbullet and IFTTT‘s website on your PC and log in with the same Google account.
3. Having done that, now download and install the Push2Run (Free) application on your computer. You have almost set up the base, now we will move to the crucial steps.
4. Click on this link to open your Pushbullet’s account page. Now, scroll down and look for “Access Tokens”. After that, click on the “Create Access Token” button and it will offer you a string of key values. Copy that token and make sure you don’t share it with anyone.

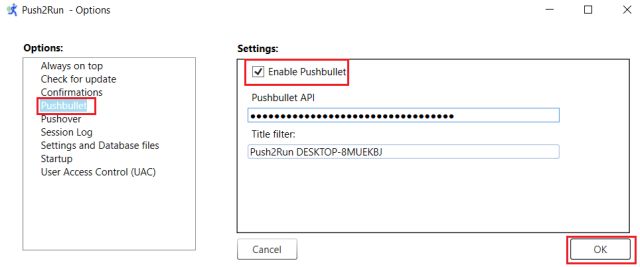
5. Now open Push2Run application on your PC and go through the initial setup. On the first dialog, select “Pushbullet” in the left menu and check the box for “Enable Pushbullet”. After that, paste the copied token (from step #4) in the Pushbullet API box. Next, copy whatever is inside the “Title Filter” box and click on the “Ok” button.
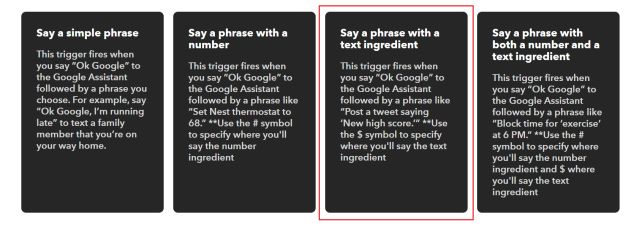
6. Now, click on this link to create an IFTTT task. After that, click on the “+” button and then search for “Google Assistant”. Click on it and then select “Say a phrase with a text ingredient”.
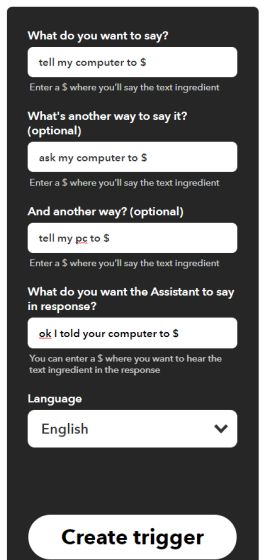
7. On the next page, enter the voice commands that you will use to connect with your PC. I have chosen these commands to call on my PC, but you can choose your own set of commands. However, for now, I would advise you to follow my voice commands just so everything works without any issue. Keep in mind, the “$” sign is the task that you will ask your computer to execute. Finally, click on the “Create Trigger” button.
Note: In case, it shows some Google Assistant related errors, open this IFTTT Settings page and click on the “Edit” button. Now, authorize a fresh use of Google Assistant from your account.
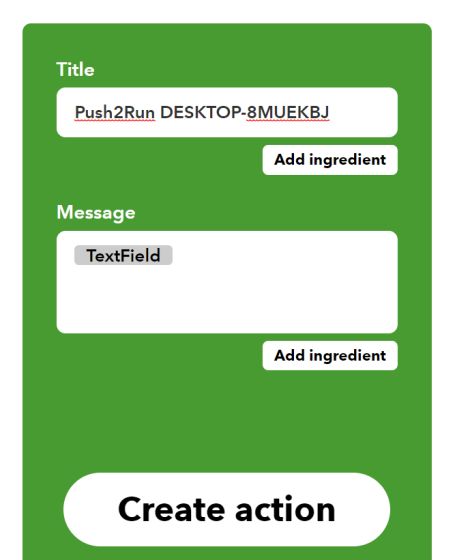
8. Now onto the next page, click on “then that” part of the sentence. Here, search for “Pushbullet” and open it. After that, click on “Push a Note”. Next, paste the copied text from step #5 (Title Filter) inside the “Title” box. Finally, click on the “Create Action” button.
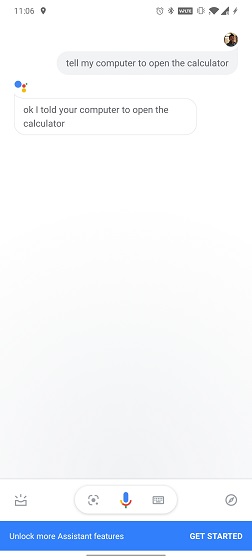
9. You are almost done. You can give a try by saying “OK Google tell my computer to open the calculator”. The calculator app should open up on your PC without any issue. Also, if everything is set up correctly, you should see “Pushbullet connection is good” in the bottom bar of the Push2Run app.
2. Create Push2Run Tasks
Now that you have successfully connected Google Assistant with your PC, you can create tasks that you would like to perform with a voice command. For example, in this section, I will show you how to open the Beebom website on PC with Google Assistant. Here we go.
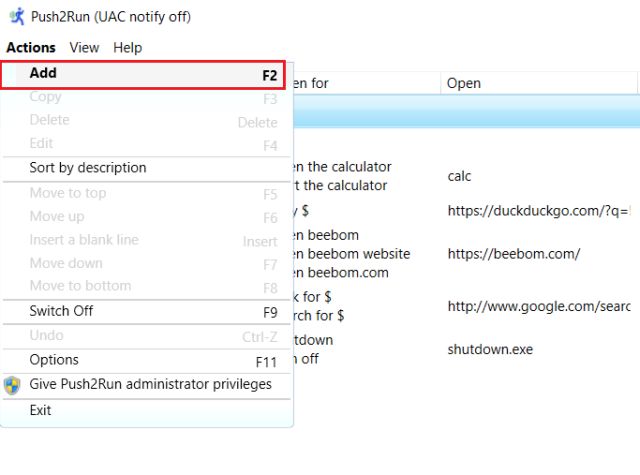
1. Open the Push2Run app and click on “Actions” from the menu. Here, click on “Add”.
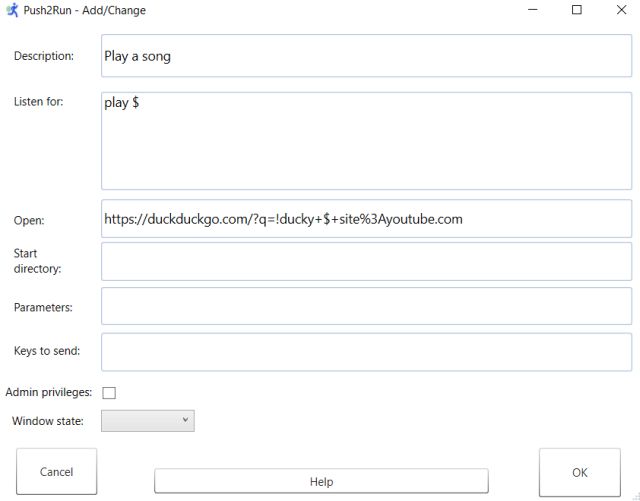
2. This is the window where you have to define everything. You can give a description of your task say, Beebom. Next, under the “Listen for” box, enter the voice command that you are likely to say. For example, I have entered, open beebom, open beebom.com, open beebom website. You can go to any length, right? Next, in the “Open” section, enter the URL directly. Make sure, the URLs have HTTP or www initializer. After that, hit the “OK” button.

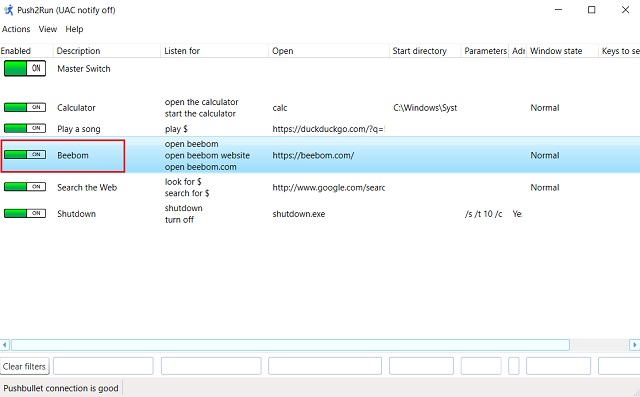
3. Now, turn on the toggle in the main window and summon Google Assistant. Just say “tell my computer to open beebom” and your PC will instantly open the website in the default browser.
Note: We tried to open multiple websites through Chrome, but it didn’t work due to some bugs either in Push2Run or Windows 10. So, we changed the default web browser to Microsoft Edge and it started working flawlessly. To change the default browser from Windows Settings, open Settings -> Apps -> Default Apps -> Web Browser.
4. If you want to search for anything and not some particular website then you can create another task. Keep the description as you want and change “listen for” command to something like this: look for $, search for $ where $ is the query that you are searching for. And in the “Open” section, paste this: http://www.google.com/search?q=$. It will make sure the search results are from Google. Now summon your Assistant: “tell my computer to search for Beebom videos” and there you have it.

5. Similarly, here is another example of asking the Assistant to play a song on your PC through YouTube. We have used DuckDuckGo’s quick play URL feature. Here is the “Open” field for you to copy: https://duckduckgo.com/?q=!ducky+$+site%3Ayoutube.com
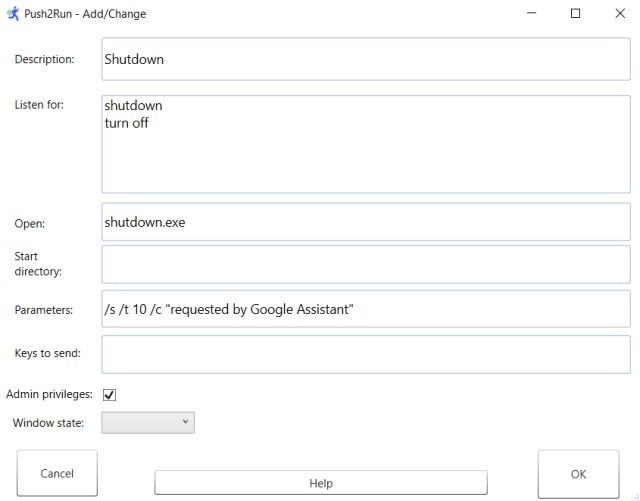
6. This is the last example in this article. Say, you want to shut down your computer with Google Assistant. It’s even easier. Keep the Open field as shutdown.exe and parameters as /s /t 10 /c "requested by Google Assistant". Here, we are using the native shutdown.exe program to turn off the computer and providing a bunch of parameters to convey a certain message.
/s means shutdown
/t 10 means shutdown after a timeout of 10 seconds
/c is a syntax for comments which is displayed before shut down
Note: As this task changes the state of the PC, it requires Admin permission. So to grant it, click on the “Actions” menu and grant “Push2Run Administrator Privilege”.
What More Can We Do?
Well, in the above examples, I have shown you how to interact with browsers and system applications. But there is a lot more to learn about other syntax and third-party applications. For example, you can set the volume with a voice command, play/pause videos in the VLC player, update your shopping list in a Notepad and more. I have not even mentioned Batch and Powershell integration with Push2Run. It would take PC automation to even greater heights. In the coming days, I will be bringing more in-depth tutorials so that we can interact with every Windows component with just a voice command. As for now, the developer behind Push2Run has a couple of ready-made example cards which you can simply import to the app.
Control Your Windows PC with Google Assistant Like a Pro
So that was our deep dive into how we can control Windows computers with Google Assistant. The Push2Run app is simply phenomenal and has made the automation process much more seamless. So, if you like the application, consider donating the developer here. Anyway, that is all from us. If you learned new things from the article and want to see similar tutorials in the future, do comment down below and let us know. And if you are facing any issue, let us know in the comment section.
[the_ad id='1307']
Source link
[the_ad id='1307']